引入
1. 概念
JDBC(Java DataBase Connectivity, Java数据库连接) ,是一种用于执行SQL语句的Java API,为多种关系数据库提供统一访问,它由一组用Java语言编写的类和接口组成
2. 依赖
导入依赖
src下创建一个文件夹命名lib,然后把依赖包复制到里面,右键create library

移除依赖
setting ——>project structure
3. 实例
1:加载一个Driver驱动
1
2
|
Driver driver = new com.mysql.cj.jdbc.Driver();
|
2:创建数据库连接(Connection)
1
2
3
4
5
6
7
8
9
|
String url = "jdbc:mysql://127.0.0.1:3306/mytestdb?useSSL=false&useUnicode=true&characterEncoding=UTF-8&serverTimezone=Asia/ShangHai";
String user = "root";
String password = "root";
Connection connection = DriverManager.getConnection(url,user,password);
|
3:创建SQL命令发送器Statement
1
2
|
Statement statement = connection.createStatement();
|
4:通过Statement发送SQL命令并得到结果
statement.executeUpdate 在sql操作insert、delete、update时使用
1
2
3
4
|
String sql = "insert into dept values(50,'教学部','BeiJing')";
int row = statement.executeUpdate(sql);
System.out.println("影响行数为"+ row);
|
5:关闭数据库资源ResultSet Statement Connection
1
2
3
|
statement.close();
connection.close();
|
结果

4. 常见的异常分析
MySQL8中数据库连接的四个参数有两个发生了变化
String driver = “com.mysql.cj.jdbc.Driver”;
String url = “jdbc:mysql://127.0.0.1:3306/mydb?useSSL=false&useUnicode=true&characterEncoding=utf8&serverTimezone=Asia/Shanghai”;
或者String url = “…….serverTimezone=GMT%2B8”;
- 错误1:Exception in thread “main” java.lang.ClassNotFoundException: com.mysql.jdbc2.Driver
原因:没有添加jar包或者com.mysql.jdbc2.Driver路径错误
- 错误2:Exception in thread “main” java.sql.SQLException:No suitable driver found for jbdc:mysql://127.0.0.1:3306/stumgr
原因:url错误
- 错误3:Exception in thread “main” java.sql.SQLException:
Access denied for user ‘root‘@’localhost’ (using password: YES)
原因:用户名或者密码错误
- 错误4:Exception in thread “main” com.mysql.jdbc.exceptions

.jdbc4.MySQLIntegrityConstraintViolationException:Duplicate entry ‘90’ for key ‘PRIMARY’
原因:主键冲突
错误5:Public Key Retrieval is not allowed
如果用户使用 sha256_password 认证,密码在传输过程中必须使用 TLS 协议保护,但是如果 RSA 公钥不可用,可以使用服务器提供的公钥;可以在连接中通过 ServerRSAPublicKeyFile 指定服务器的 RSA 公钥,或者AllowPublicKeyRetrieval=True参数以允许客户端从服务器获取公钥;但是需要注意的是 AllowPublicKeyRetrieval=True可能会导致恶意的代理通过中间人攻击(MITM)获取到明文密码,所以默认是关闭的,必须显式开启
在jdbc连接添加上参数allowPublicKeyRetrieval=true即可,注意参数间用&
加参数allowPublicKeyRetrieval=true
1. 驱动的加载
在查看Driver的源代码时我们发现,该类内部有一个静态代码块,在代码块中就是在实例化一个驱动并在驱动中心注册.静态代码块会在类进入内存时执行,也就是说,我们只要让该类字节码进入内存,就会自动完成注册,不需要我们手动去new

可以通过反射来加载驱动
1
2
|
Class.forName("com.mysql.cj.jdbc.Driver");
|
因为Driver类里面的静态代码块已经注册了驱动,就不用再单独注册驱动了
查看jar包发现,jar包中已经默认配置了驱动类的加载,其实不需要手动加载,程序运行的时候也会自动加载jar包里的类
2. 添加异常处理

将需要catch的异常部分 用快捷键ctrl+alt+T选择

把最后处理放在finally里面,分别加上try catch
1
2
3
4
5
6
7
8
9
10
11
12
13
14
15
16
17
18
19
20
21
22
23
24
25
26
27
28
29
30
31
32
33
34
35
36
37
38
39
| public class TestJDBC2 {
private static String driver="com.mysql.cj.jdbc.Driver";
private static String url = "jdbc:mysql://127.0.0.1:3306/mytestdb?useSSL=false&useUnicode=true&characterEncoding=UTF-8&serverTimezone=Asia/Shanghai&allowPublicKeyRetrieval=true";
private static String user= "root";
private static String password = "root";
public static void main(String[] args) {
Connection connection = null;
Statement statement = null;
try {
Class.forName(driver);
connection = DriverManager.getConnection(url,user,password);
statement = connection.createStatement();
String sql = "insert into dept values(50,'教学部','BeiJing')";
int row = statement.executeUpdate(sql);
System.out.println("影响行数为"+ row);
} catch (ClassNotFoundException e) {
e.printStackTrace();
} catch (SQLException e) {
e.printStackTrace();
} finally {
if(null != statement){
try {
statement.close();
} catch (SQLException e) {
e.printStackTrace();
}
}
if(null != connection){
try {
connection.close();
} catch (SQLException e) {
e.printStackTrace();
}
}
}
}
}
|
3. JDBC完成CURD
删除和修改操作
和上面实例一样,只需要改sql语句
1
| String sql = "delete from emp where deptno = 20 ";
|
1
| String sql = "update dept set dname = '总部',loc='BeiJing' where deptno = 30 ";
|
查询操作
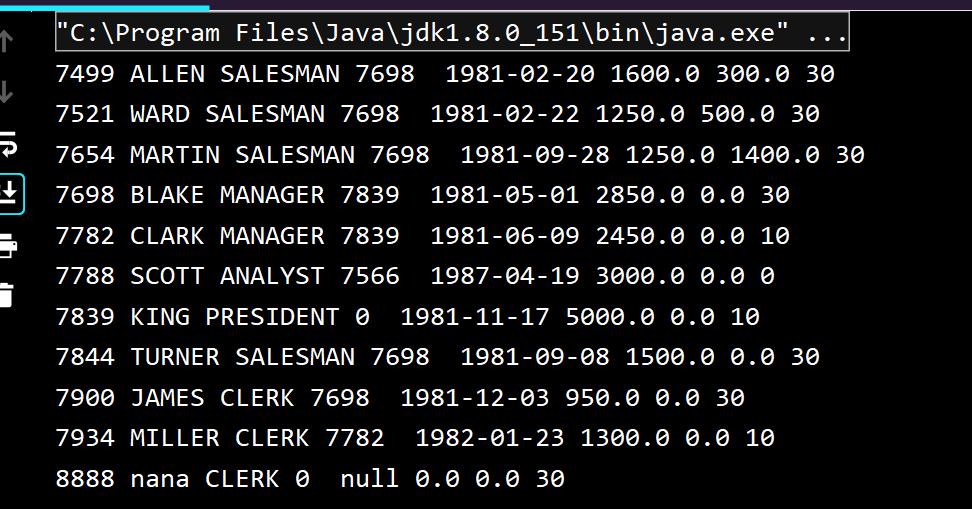
- 使用的方法是executeQuery(),返回的是一个结果集即表格被抽象成的对象 resultSet
1
2
| String sql = "select * from emp";
ResultSet resultSet = statement.executeQuery(sql);
|
1
2
3
4
5
6
7
8
9
10
11
| while (resultSet.next()){
int empno = resultSet.getInt("empno");
String ename = resultSet.getString("ename");
String job = resultSet.getString("job");
int MGR = resultSet.getInt("MGR");
Date date = resultSet.getDate("hiredate");
double sal = resultSet.getDouble("SAL");
double comm = resultSet.getDouble("comm");
int deptno = resultSet.getInt("deptno");
System.out.println(empno+" "+ename+" "+job+" "+MGR+" "+" "+date+" "+sal+" "+comm+" "+deptno);
}
|
ps: 获得的date对象不是util包的,而是sql包的对象
1
2
3
4
5
6
7
| if(null != resultSet){
try {
resultSet.close();
} catch (SQLException e) {
e.printStackTrace();
}
}
|
完整代码
1
2
3
4
5
6
7
8
9
10
11
12
13
14
15
16
17
18
19
20
21
22
23
24
25
26
27
28
29
30
31
32
33
34
35
36
37
38
39
40
41
42
43
44
45
46
47
48
49
50
51
52
53
54
55
56
57
58
59
60
61
62
63
64
65
66
67
68
69
70
71
72
73
74
75
76
| package com.chs.test01;
import java.sql.*;
import static java.lang.Class.forName;
public class TestJDBC4 {
private static String driver = "com.mysql.cj.jdbc.Driver";
private static String url ="jdbc:mysql://127.0.0.1:3306/mytestdb?" +
"useSSL=false&useUnicode=true&characterEncoding=UTF-8&" +
"serverTimezone=Asia/Shanghai&allowPublicKeyRetrieval=true";
private static String user = "root";
private static String password = "root";
public static void main(String[] args) {
testQuery();
}
public static void testQuery(){
Connection connection = null;
Statement statement = null;
ResultSet resultSet = null;
try {
forName(driver);
connection = DriverManager.getConnection(url,user,password);
statement = connection.createStatement();
String sql = "select * from emp";
resultSet = statement.executeQuery(sql);
while (resultSet.next()){
int empno = resultSet.getInt("empno");
String ename = resultSet.getString("ename");
String job = resultSet.getString("job");
int MGR = resultSet.getInt("MGR");
Date date = resultSet.getDate("hiredate");
double sal = resultSet.getDouble("SAL");
double comm = resultSet.getDouble("comm");
int deptno = resultSet.getInt("deptno");
System.out.println(empno+" "+ename+" "+job+" "+MGR+" "+" "+date+" "+sal+" "+comm+" "+deptno);
}
} catch (ClassNotFoundException | SQLException e) {
e.printStackTrace();
}finally{
if(null != resultSet){
              try {
                  resultSet.close();
              } catch (SQLException e) {
                  e.printStackTrace();
              }
          }
if(null != statement){
try {
statement.close();
} catch (SQLException e) {
e.printStackTrace();
}
}
if(null != connection){
try {
connection.close();
} catch (SQLException e) {
e.printStackTrace();
}
}
}
}
}
|
结果:
创建实体类封装结果集
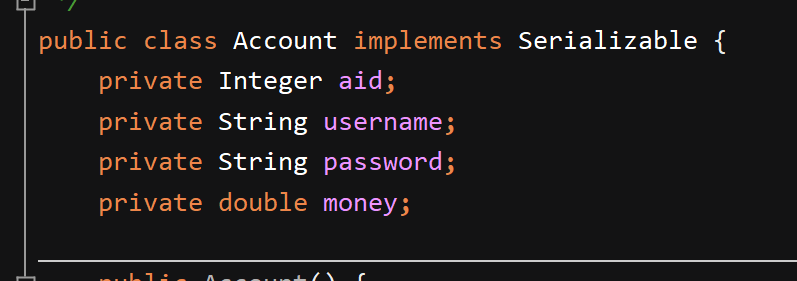
该实体类是和数据表格名称和字段是一一对应的类,该类主要用处是存储重数据库中查询出来的数据,除此之外该类无其他功能。
Emp.java
要求:
- 类名和表名保持一致
- 属性个数和表的列数保持一致
- 属性的数据类型和列的数据类型保持一致
- 属性名和表格列名保持一致
- 所有的属性都是私有的 (出于安全考虑)
- 实体类的属性推荐写成包装类 (例如int类型不能赋值为null)
- 日期类型建议使用java.util.Date(因为是父类,比较方便使用多态)
- 所有的属性都要有get和set方法
- 必须具备空参构造器
- 实体类需要实现序列化接口(mybatis 分布式)
- 实体类中其他构造方法可选
- 添加toString方法
1
2
3
4
5
6
7
8
9
10
11
12
13
14
15
16
17
18
19
20
21
22
23
24
25
26
27
28
29
30
31
32
33
34
35
36
37
38
| package com.chs.entity;
import com.sun.scenario.effect.impl.prism.PrRenderInfo;
import java.io.Serializable;
import java.util.Date;
public class Emp implements Serializable {
private Integer empno;
private String ename;
private String job;
private Integer mgr;
private Date hiredate;
private Double sal;
private Double comm;
private Integer deptno;
public Emp(Integer empno, String ename, String job, Integer mgr, Date hiredate, Double sal, Double comm, Integer deptno) {
this.empno = empno;
this.ename = ename;
this.job = job;
this.mgr = mgr;
this.hiredate = hiredate;
this.sal = sal;
this.comm = comm;
this.deptno = deptno;
}
public Emp() {
}
}
|
TestJDBC.java
修改—返回的是Emp的List集合对象:
1
| public static List<Emp> testQuery(){}
|
main()方法里面遍历输出:
1
2
3
4
5
6
7
8
| public static void main(String[] args) {
List<Emp> emps = testQuery();
for(Emp emp:emps){
System.out.println(emp);
}
}
|
完整代码
1
2
3
4
5
6
7
8
9
10
11
12
13
14
15
16
17
18
19
20
21
22
23
24
25
26
27
28
29
30
31
32
33
34
35
36
37
38
39
40
41
42
43
44
45
46
47
48
49
50
51
52
53
54
55
56
57
58
59
60
61
62
63
64
65
66
67
68
69
70
71
72
73
74
75
76
|
public class TestJDBC4 {
private static String driver = "com.mysql.cj.jdbc.Driver";
private static String url ="jdbc:mysql://127.0.0.1:3306/mytestdb?" +
"useSSL=false&useUnicode=true&characterEncoding=UTF-8&" +
"serverTimezone=Asia/Shanghai&allowPublicKeyRetrieval=true";
private static String user = "root";
private static String password = "root";
public static void main(String[] args) {
List<Emp> emps = testQuery();
for(Emp emp:emps){
System.out.println(emp);
}
}
public static List<Emp> testQuery(){
Connection connection = null;
Statement statement = null;
ResultSet resultSet = null;
List<Emp> list = null;
try {
forName(driver);
connection = DriverManager.getConnection(url,user,password);
statement = connection.createStatement();
String sql = "select * from emp";
resultSet = statement.executeQuery(sql);
list= new ArrayList<>();
while (resultSet.next()){
int empno = resultSet.getInt("empno");
String ename = resultSet.getString("ename");
String job = resultSet.getString("job");
int MGR = resultSet.getInt("MGR");
Date date = resultSet.getDate("hiredate");
double sal = resultSet.getDouble("SAL");
double comm = resultSet.getDouble("comm");
int deptno = resultSet.getInt("deptno");
Emp emp = new Emp(empno, ename, job, MGR, date, sal, comm, deptno);
list.add(emp);
}
} catch (ClassNotFoundException | SQLException e) {
e.printStackTrace();
}finally{
if(null != resultSet){
try {
resultSet.close();
} catch (SQLException e) {
e.printStackTrace();
}
}
if(null != statement){
try {
statement.close();
} catch (SQLException e) {
e.printStackTrace();
}
}
if(null != connection){
try {
connection.close();
} catch (SQLException e) {
e.printStackTrace();
}
}
}
return list;
}
}
|
4. 预编译PreparedStatement
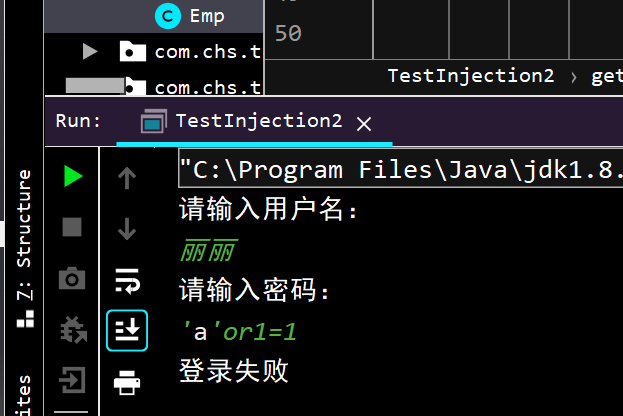
使用预编译语句来预防SQL注入攻击
SQL注入攻击指的是通过构建特殊的输入作为参数传入Web应用程序,而这些输入大都是SQL语法里的一些组合,通过执行SQL语句进而执行攻击者所要的操作,其主要原因是程序没有细致地过滤用户输入的数据,致使非法数据侵入系统。
模拟登录
在前台输入用户名和密码,后台判断信息是否正确,并给出前台反馈信息,前台输出反馈信息。
具体实现步骤:
创建数据库表

创建实体类
测试类:
1
2
3
4
5
6
7
8
9
10
11
12
13
14
15
16
17
18
19
20
21
22
23
24
25
26
27
28
29
30
31
32
33
34
35
36
37
38
39
40
41
42
43
44
45
46
47
48
49
50
51
52
53
54
55
56
57
58
59
60
61
62
63
64
65
66
67
68
69
70
71
72
73
74
75
76
|
public class TestInjection {
private static String driver = "com.mysql.cj.jdbc.Driver";
private static String url ="jdbc:mysql://127.0.0.1:3306/mytestdb?" +
"useSSL=false&useUnicode=true&characterEncoding=UTF-8&" +
"serverTimezone=Asia/Shanghai&allowPublicKeyRetrieval=true";
private static String user = "root";
private static String password = "root";
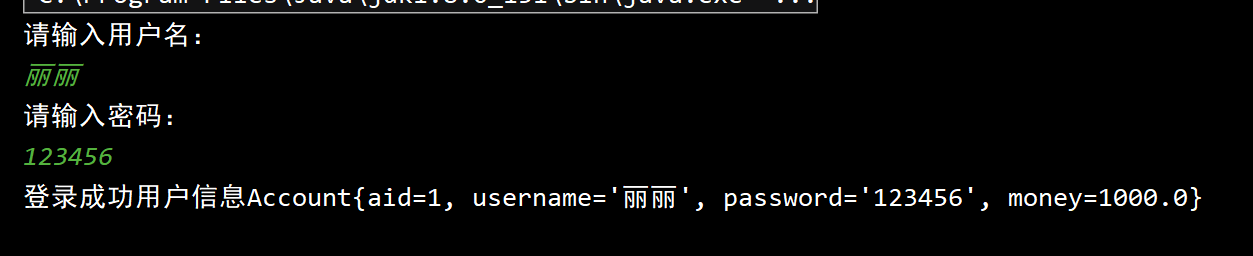
public static void main(String[] args) {
Scanner sc = new Scanner(System.in);
System.out.println("请输入用户名:");
String username = sc.next();
System.out.println("请输入密码:");
String pwd = sc.next();
Account account = getAccount(username, pwd);
System.out.println(null!=account?("登录成功"+"用户信息"+account):"登录失败");
}
public static Account getAccount(String username,String pwd){
Connection connection = null;
Statement statement = null;
ResultSet resultSet = null;
Account account = null;
try {
forName(driver);
connection = DriverManager.getConnection(url,user,password);
statement = connection.createStatement();
String sql = "select * from account where username = '"+username+"'and password = '"+pwd+"'";
resultSet = statement.executeQuery(sql);
while (resultSet.next()){
int aid = resultSet.getInt("aid");
String usernamea = resultSet.getString("username");
String pwda = resultSet.getString("password");
Double balance = resultSet.getDouble("balance");
account = new Account(aid,usernamea,pwda,balance);
}
} catch (ClassNotFoundException | SQLException e) {
e.printStackTrace();
}finally{
if(null != resultSet){
try {
resultSet.close();
} catch (SQLException e) {
e.printStackTrace();
}
}
if(null != statement){
try {
statement.close();
} catch (SQLException e) {
e.printStackTrace();
}
}
if(null != connection){
try {
connection.close();
} catch (SQLException e) {
e.printStackTrace();
}
}
return account;
}
}
}
|
结果:
注入攻击
构建特殊的输入:
例如输入密码
整个sql语句就会变为
1
| select * from account where username = 'asdf' and password = 'asdf'or'a'='a';
|
导致含义改变。
通过预编译语句来预防
- 使用PreparedStatement语句对象防止注入攻击
- PreparedStatement 可以使用 ? 作为参数的占位符,即使是字符串和日期类型,也不使用单独再添加 ‘ ‘
- connection.createStatement();获得的是普通语句对象 Statement
ction.prepareStatement(sql);可以获得一个预编译语句对象PreparedStatement
- 如果SQL语句中有?作为参数占位符号,那么要在执行CURD之前先设置参数
***(问号的编号,数据) 方法设置参数
1
2
3
4
5
6
7
| String sql="select * from account where username = ? and password = ?";
preparedStatement = connection.prepareStatement(sql);
preparedStatement.setString(1,username );
preparedStatement.setString(2,pwd );
resultSet = preparedStatement.executeQuery();
|
效果:
原理:
说白了就是把值当中的所有单引号给转义了!这就达到了防止sql注入的目的,说白了mysql驱动的PreparedStatement实现类的setString();方法内部做了单引号的转义,而Statement不能防止sql注入,就是因为它没有把单引号做转义,而是简单粗暴的直接拼接字符串,所以达不到防止sql注入的目的。
预编译的原理
预编译的开启
值得注意的是,我们的Connector/J 5.0.5及之后useServerPrepStmts默认false,就是默认没有开启预编译,之前默认为true, cachePrepStmts 一直默认为false,需要我们手动设置才可以启用预编译,在开启预编译的同时要同时开启预编译缓存才能带来些许的性能提升.
1
| "jdbc:mysql://localhost:3306/mydb?*****&useServerPrepStmts=true&cachePrepStmts=true";
|
优点
预编译实现CURD
TestPreparedStatement.java
1
2
3
4
5
6
7
8
9
10
11
12
13
14
15
16
17
18
19
20
21
22
23
24
25
26
27
28
29
30
31
32
33
34
35
36
37
38
39
40
41
42
43
44
45
46
47
48
49
50
51
52
53
54
55
56
57
58
59
60
61
62
63
64
65
66
67
68
69
70
71
72
73
74
75
76
77
78
79
80
81
82
83
84
85
86
87
88
89
90
91
92
93
94
95
96
97
98
99
100
101
102
103
104
105
106
107
108
109
110
111
112
113
114
115
116
117
118
|
public class TestPreparedStatement {
private static String driver = "com.mysql.cj.jdbc.Driver";
private static String url = "jdbc:mysql://127.0.0.1:3306/mytestdb?" +
"useSSL=false&useUnicode=true&characterEncoding=UTF-8&" +
"serverTimezone=Asia/Shanghai&allowPublicKeyRetrieval=true";
private static String user = "root";
private static String password = "root";
public static void main(String[] args) {
testAdd();
testUpdate();
testDelete();
testQuery();
}
public static void testAdd() {
Connection connection = null;
PreparedStatement preparedStatement = null;
try {
forName(driver);
connection = DriverManager.getConnection(url, user, password);
String sql = "insert into emp values(DEFAULT,?,?,?,?,?,?,?)";
preparedStatement = connection.prepareStatement(sql);
preparedStatement.setString(1, "Mark");
preparedStatement.setString(2, "MANAGER");
preparedStatement.setInt(3, 7839);
preparedStatement.setDate(4, new Date(System.currentTimeMillis()));
preparedStatement.setDouble(5, 3000.12);
preparedStatement.setDouble(6, 0.0);
preparedStatement.setDouble(7, 30);
int rows = preparedStatement.executeUpdate();
System.out.println("影响行数" + rows);
}
catch(){}finally{}
}
}
public static void testUpdate() {
Connection connection = null;
PreparedStatement preparedStatement = null;
try {
forName(driver);
connection = DriverManager.getConnection(url, user, password);
String sql = "update emp set ename =?,job= ? where empno = ?";
preparedStatement = connection.prepareStatement(sql);
preparedStatement.setString(1, "John");
preparedStatement.setString(2, "ANALYST");
preparedStatement.setInt(3, 7777);
int rows = preparedStatement.executeUpdate();
System.out.println("影响行数" + rows);
}catch(){}finally{}
}
}
public static void testDelete() {
Connection connection = null;
PreparedStatement preparedStatement = null;
try {
forName(driver);
connection = DriverManager.getConnection(url, user, password);
String sql = "delete from emp where empno = ?";
preparedStatement = connection.prepareStatement(sql);
preparedStatement.setInt(1, 7777);
int rows = preparedStatement.executeUpdate();
System.out.println("影响行数" + rows);
} catch(){}finally{}
}
}
public static void testQuery() {
Connection connection = null;
PreparedStatement preparedStatement = null;
ResultSet resultSet = null;
List<Emp> list = null;
try {
forName(driver);
connection = DriverManager.getConnection(url, user, password);
String sql = "select * from emp where ename like ?";
preparedStatement = connection.prepareStatement(sql);
preparedStatement.setString(1,"%A%");
resultSet = preparedStatement.executeQuery();
list= new ArrayList<>();
while (resultSet.next()) {
int empno = resultSet.getInt("empno");
String ename = resultSet.getString("ename");
String job = resultSet.getString("job");
int MGR = resultSet.getInt("MGR");
Date date = resultSet.getDate("hiredate");
double sal = resultSet.getDouble("SAL");
double comm = resultSet.getDouble("comm");
int deptno = resultSet.getInt("deptno");
Emp emp = new Emp(empno, ename, job, MGR, date, sal, comm, deptno);
list.add(emp);
}
} catch () {} finally {}
for(Emp e:list){
System.out.println(e);
}
}
}
|
5. 批处理
概念
当我们有多条sql语句需要发送到数据库执行的时候,有两种发送方式,一种是执行一条发送一条sql语句给数据库,另一个种是发送一个sql集合给数据库,也就是发送一个批sql到数据库。普通的执行过程是:每处理一条数据,就访问一次数据库;而批处理是:累积到一定数量,再一次性提交到数据库,减少了与数据库的交互次数,所以效率会大大提高,很显然两者的数据库执行效率是不同的,我们发送批处理sql的时候数据库执行效率要高
Statement和preparedStatement的批处理区别
- statement语句对象实现批处理有如下问题
- 缺点:采用硬编码效率低,安全性较差。
- 原理:硬编码,每次执行时相似SQL都会进行编译
- PreparedStatement+批处理
- 优点:语句只编译一次,减少编译次数。提高了安全性(阻止了SQL注入)
- 原理:相似SQL只编译一次,减少编译次数
批处理开启
1
| "&rewriteBatchedStatements=true"
|
实例
向部门表中增加多条数据
利用循环添加,并每1000为一批,放入之后清除
1
2
3
4
5
6
7
8
9
10
11
12
13
14
15
16
17
| String sql = "insert into dept values(default ,?,?)";
preparedStatement = connection.prepareStatement(sql);
for (int i = 0; i < 10036 i++) {
preparedStatement.setString(1,"name");
preparedStatement.setString(2,"location");
preparedStatement.addBatch();
if(i%1000==0){
preparedStatement.executeBatch();
preparedStatement.clearBatch();
}
}
preparedStatement.executeBatch();
preparedStatement.addBatch();
|
6.JDBC控制事务
主要是在学习如何让多个数据库操作成为一个整体,实现要么全部执行成功,要么全部都不执行
在JDBC中,事务操作是自动提交,一条对数据库的DML代表一项事务操作
转账的操作:
1
2
3
4
5
6
7
8
9
10
11
12
13
14
15
16
17
18
19
20
21
22
23
24
25
26
27
28
29
30
31
32
33
34
35
36
37
38
39
40
41
42
43
44
45
46
47
48
49
50
51
52
53
54
55
56
57
|
public class TestTransaction {
private static String driver = "com.mysql.cj.jdbc.Driver";
private static String url = "jdbc:mysql://127.0.0.1:3306/mytestdb?" +
"useSSL=false&useUnicode=true&characterEncoding=UTF-8&" + "serverTimezone=Asia/Shanghai&allowPublicKeyRetrieval=true&useServerPrepStmts=true&cachePrepStmts=true&rewriteBatchedStatements=true";
private static String user = "root";
private static String password = "root";
public static void main(String[] args) {
testTransaction();
}
public static void testTransaction(){
Connection connection = null;
PreparedStatement preparedStatement = null;
try {
forName(driver);
connection = DriverManager.getConnection(url, user, password);
String sql = "update account set balance = balance-? where aid =?";
preparedStatement = connection.prepareStatement(sql);
preparedStatement.setDouble(1,100);
preparedStatement.setInt(2,1);
preparedStatement.executeUpdate();
preparedStatement.setDouble(1,-100);
preparedStatement.setInt(2,2);
preparedStatement.executeUpdate();
} catch (ClassNotFoundException | SQLException e) {
e.printStackTrace();
} finally {
if (null != preparedStatement) {
try {
preparedStatement.close();
} catch (SQLException e) {
e.printStackTrace();
}
}
if (null != connection) {
try {
connection.close();
} catch (SQLException e) {
e.printStackTrace();
}
}
}
}
}
|
为了保证多个sql语句一起执行,使用事务。
在JDBC中,事务操作是自动提交。一条对数据库的DML(insert、update、delete)代表一项事务操作,操作成功后,系统将自动调用commit()提交,否则自动调用rollback()回滚。
设置事务手动提交
1
2
3
4
5
6
7
8
9
10
11
12
13
14
15
16
17
18
19
20
21
22
23
24
25
26
27
28
29
30
31
32
33
34
35
36
37
38
39
40
41
42
43
44
45
46
47
48
49
50
51
| try {
forName(driver);
connection = DriverManager.getConnection(url, user, password);
String sql = "update account set balance = balance-? where aid =?";
preparedStatement = connection.prepareStatement(sql);
preparedStatement.setDouble(1,100);
preparedStatement.setInt(2,1);
preparedStatement.executeUpdate();
int i =1/0;
preparedStatement.setDouble(1,-100);
preparedStatement.setInt(2,2);
preparedStatement.executeUpdate();
} catch (Exception e) {
if(null!=connection){
try {
connection.rollback();
} catch (SQLException ex) {
ex.printStackTrace();
}
}
} finally {
if(null!=connection){
try {
connection.commit();
} catch (SQLException e) {
e.printStackTrace();
}
}
if (null != preparedStatement) {
try {
preparedStatement.close();
} catch (SQLException e) {
e.printStackTrace();
}
}
if (null != connection) {
try {
connection.close();
} catch (SQLException e) {
e.printStackTrace();
}
}
}
|
设置回滚点
作用是保证回滚点之前的数据更改生效,回滚点以后的数据更改操作就会无效。
并且回滚点的操作值可以进行更改和设置。
1
2
3
4
5
6
7
8
9
10
11
12
13
14
15
16
17
18
19
20
21
22
23
| connection = DriverManager.getConnection(url, user, password);
connection.setAutoCommit(false);
String sql = "insert into dept values(default ,?,?)";
preparedStatement = connection.prepareStatement(sql);
for (int i = 0; i < 10036; i++) {
preparedStatement.setString(1,"name");
preparedStatement.setString(2,"location");
preparedStatement.addBatch();
if(i%1000==0){
preparedStatement.executeBatch();
preparedStatement.clearBatch();
Savepoint savepoint = connection.setSavepoint();
savepoints.addLast(savepoint);
}
if(i==10001){
int x =1/0;
}
}
preparedStatement.executeBatch();
preparedStatement.addBatch();
|
- 出现异常是10000以后,在最后一个回滚点回滚,剩下36则不保留
1
2
3
4
5
6
7
8
9
10
11
12
13
| catch (Exception e) {
if (null != connection) {
try {
Savepoint sp = savepoints.getLast();
if(null != sp){
connection.rollback(sp);}
} catch (SQLException ex) {
ex.printStackTrace();
}
}
e.printStackTrace();
}
|
1
2
|
Savepoint sp = savepoints.get(4);
|
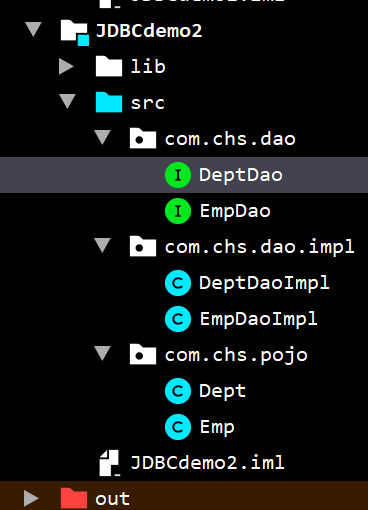
7. DAO模式
项目结构
实体类:和数据库表格一一对应的类,单独放入一个包中,包名往往是 pojo/entity/bean,要操作的每个表格都应该有对应的实体类
emp > class Emp
dept > class Dept
account > class Account
DAO层:定义了对数据要执行那些操作的接口和实现类,包名往往是 dao/mapper,要操作的每个表格都应该有对应的接口和实现类
Mybatis/Spring-JDBCTemplate 中,对DAO层代码进行了封装,代码编写方式会有其他变化
项目截图
接口类(DAO层)
Emp.java
1
2
3
4
5
6
7
8
9
10
11
12
13
14
15
16
17
18
19
20
21
22
23
24
25
26
27
28
29
30
31
32
33
34
35
36
|
public interface EmpDao {
int addEmp(Emp emp);
int deleteByEmpno(int empno);
List<Emp> findAll();
int updateEmp(Emp emp);
}
|
Dept.java
1
2
3
4
5
6
7
8
9
10
11
12
13
14
15
16
17
18
19
20
|
public interface DeptDao {
List<Dept> findAll();
int addDept(Dept dept);
}
|
实现类(未被抽取的)
EmpDaoImpl.java
1
2
3
4
5
6
7
8
9
10
11
12
13
14
15
16
17
18
19
20
21
22
23
24
25
26
27
28
29
30
31
32
33
34
35
36
37
38
39
40
41
42
43
44
45
46
47
48
49
50
51
52
53
54
55
56
57
58
59
60
61
62
63
64
65
66
67
68
69
70
71
72
73
74
75
76
77
78
79
80
81
82
83
84
85
86
87
88
89
90
91
92
93
94
95
96
97
98
99
100
101
102
103
104
105
106
107
108
109
110
111
112
113
114
115
116
117
118
119
120
121
122
123
124
125
126
127
128
129
130
131
132
133
134
135
136
137
138
139
140
141
142
143
144
145
146
147
148
149
150
151
152
153
154
155
156
157
158
159
160
161
162
163
164
165
166
167
168
169
170
171
172
173
174
175
176
177
178
179
180
181
182
183
184
185
186
187
188
189
190
191
192
193
|
public class EmpDaoImpl implements EmpDao {
private static String driver = "com.mysql.cj.jdbc.Driver";
private static String url = "jdbc:mysql://127.0.0.1:3306/mytestdb?" +
"useSSL=false&useUnicode=true&characterEncoding=UTF-8&" +
"serverTimezone=Asia/Shanghai&allowPublicKeyRetrieval=true";
private static String user = "root";
private static String password = "root";
@Override
public int addEmp(Emp emp) {
Connection connection = null;
PreparedStatement preparedStatement = null;
int rows= 0;
try {
forName(driver);
connection = DriverManager.getConnection(url, user, password);
String sql = "insert into emp values(DEFAULT,?,?,?,?,?,?,?)";
preparedStatement = connection.prepareStatement(sql);
preparedStatement.setObject(1, emp.getEname());
preparedStatement.setObject(2, emp.getJob());
preparedStatement.setObject(3, emp.getMgr());
preparedStatement.setObject(4, emp.getHiredate());
preparedStatement.setObject(5, emp.getSal());
preparedStatement.setObject(6, emp.getComm());
preparedStatement.setObject(7, emp.getDeptno());
rows = preparedStatement.executeUpdate();
} catch (ClassNotFoundException | SQLException e) {
e.printStackTrace();
} finally {
if (null != preparedStatement) {
try {
preparedStatement.close();
} catch (SQLException e) {
e.printStackTrace();
}
}
if (null != connection) {
try {
connection.close();
} catch (SQLException e) {
e.printStackTrace();
}
}
}
return rows;
}
@Override
public int deleteByEmpno(int empno) {
Connection connection = null;
PreparedStatement preparedStatement = null;
int rows= 0;
try {
forName(driver);
connection = DriverManager.getConnection(url, user, password);
String sql = "delete from emp where empno = ?";
preparedStatement = connection.prepareStatement(sql);
preparedStatement.setObject(1, empno);
rows = preparedStatement.executeUpdate();
} catch (ClassNotFoundException | SQLException e) {
e.printStackTrace();
} finally {
if (null != preparedStatement) {
try {
preparedStatement.close();
} catch (SQLException e) {
e.printStackTrace();
}
}
if (null != connection) {
try {
connection.close();
} catch (SQLException e) {
e.printStackTrace();
}
}
}
return rows;
}
@Override
public List<Emp> findAll() {
Connection connection = null;
PreparedStatement preparedStatement = null;
ResultSet resultSet = null;
List<Emp> list = null;
try {
forName(driver);
connection = DriverManager.getConnection(url, user, password);
String sql = "select * from emp ";
preparedStatement = connection.prepareStatement(sql);
resultSet = preparedStatement.executeQuery();
list= new ArrayList<>();
while (resultSet.next()) {
int empno = resultSet.getInt("empno");
String ename = resultSet.getString("ename");
String job = resultSet.getString("job");
int MGR = resultSet.getInt("MGR");
Date date = resultSet.getDate("hiredate");
double sal = resultSet.getDouble("SAL");
double comm = resultSet.getDouble("comm");
int deptno = resultSet.getInt("deptno");
Emp emp = new Emp(empno, ename, job, MGR, date, sal, comm, deptno);
list.add(emp);
}
} catch (ClassNotFoundException | SQLException e) {
e.printStackTrace();
} finally {
if (null != resultSet) {
try {
resultSet.close();
} catch (SQLException e) {
e.printStackTrace();
}
}
if (null != preparedStatement) {
try {
preparedStatement.close();
} catch (SQLException e) {
e.printStackTrace();
}
}
if (null != connection) {
try {
connection.close();
} catch (SQLException e) {
e.printStackTrace();
}
}
}
return list;
}
@Override
public int updateEmp(Emp emp) {
Connection connection = null;
PreparedStatement preparedStatement = null;
int rows= 0;
try {
forName(driver);
connection = DriverManager.getConnection(url, user, password);
String sql = "update emp set ename = ?,job = ?,mgr = ?,hiredate=?,sal=?,comm=? ,deptno = ? where empno = ?";
preparedStatement = connection.prepareStatement(sql);
preparedStatement.setObject(1, emp.getEname());
preparedStatement.setObject(2, emp.getJob());
preparedStatement.setObject(3, emp.getMgr());
preparedStatement.setObject(4, emp.getHiredate());
preparedStatement.setObject(5, emp.getSal());
preparedStatement.setObject(6, emp.getComm());
preparedStatement.setObject(7, emp.getDeptno());
preparedStatement.setObject(8,emp.getEmpno());
rows = preparedStatement.executeUpdate();
} catch (ClassNotFoundException | SQLException e) {
e.printStackTrace();
} finally {
if (null != preparedStatement) {
try {
preparedStatement.close();
} catch (SQLException e) {
e.printStackTrace();
}
}
if (null != connection) {
try {
connection.close();
} catch (SQLException e) {
e.printStackTrace();
}
}
}
return rows;
}
}
|
这些操作都很多相似的地方,可以被抽取成为一个总的类,所以可以啊看待
DeptDaoImpl.java
1
2
3
4
5
6
7
8
9
10
11
12
13
14
15
16
17
18
19
20
21
22
23
24
25
26
27
28
29
30
31
32
33
34
35
36
37
38
39
40
41
42
43
44
45
46
47
48
49
50
51
52
53
54
55
56
57
58
59
60
61
62
63
64
65
66
67
68
69
70
71
72
73
74
75
76
77
78
79
80
81
82
83
84
85
86
87
88
89
90
91
92
93
94
95
96
97
98
99
100
101
102
103
104
|
public class DeptDaoImpl implements DeptDao {
private static String driver = "com.mysql.cj.jdbc.Driver";
private static String url = "jdbc:mysql://127.0.0.1:3306/mytestdb?" +
"useSSL=false&useUnicode=true&characterEncoding=UTF-8&" +
"serverTimezone=Asia/Shanghai&allowPublicKeyRetrieval=true";
private static String user = "root";
private static String password = "root";
@Override
public List<Dept> findAll() {
Connection connection = null;
PreparedStatement preparedStatement = null;
ResultSet resultSet = null;
List<Dept> list = null;
try {
forName(driver);
connection = DriverManager.getConnection(url, user, password);
String sql = "select * from dept ";
preparedStatement = connection.prepareStatement(sql);
resultSet = preparedStatement.executeQuery();
list= new ArrayList<>();
while (resultSet.next()) {
int deptno = resultSet.getInt("deptno");
String dname = resultSet.getString("dname");
String loc = resultSet.getString("loc");
Dept dept = new Dept(deptno,dname,loc);
list.add(dept);
}
} catch (ClassNotFoundException | SQLException e) {
e.printStackTrace();
} finally {
if (null != resultSet) {
try {
resultSet.close();
} catch (SQLException e) {
e.printStackTrace();
}
}
if (null != preparedStatement) {
try {
preparedStatement.close();
} catch (SQLException e) {
e.printStackTrace();
}
}
if (null != connection) {
try {
connection.close();
} catch (SQLException e) {
e.printStackTrace();
}
}
}
return list;
}
@Override
public int addDept(Dept dept) {
Connection connection = null;
PreparedStatement preparedStatement = null;
int rows= 0;
try {
forName(driver);
connection = DriverManager.getConnection(url, user, password);
String sql = "insert into dept values(?,?,?)";
preparedStatement = connection.prepareStatement(sql);
preparedStatement.setObject(1,dept.getDeptno());
preparedStatement.setObject(2,dept.getDname());
preparedStatement.setObject(3,dept.getLoc());
rows = preparedStatement.executeUpdate();
} catch (ClassNotFoundException | SQLException e) {
e.printStackTrace();
} finally {
if (null != preparedStatement) {
try {
preparedStatement.close();
} catch (SQLException e) {
e.printStackTrace();
}
}
if (null != connection) {
try {
connection.close();
} catch (SQLException e) {
e.printStackTrace();
}
}
}
return rows;
}
}
|
员工管理系统
EmpManageSystem.java
1
2
3
4
5
6
7
8
9
10
11
12
13
14
15
16
17
18
19
20
21
22
23
24
25
26
27
28
29
30
31
32
33
34
35
36
37
38
39
40
41
42
43
44
45
46
47
48
49
50
51
52
53
54
55
56
57
58
59
60
61
62
63
64
65
66
67
68
69
70
71
72
73
74
75
76
77
78
79
80
81
82
83
84
85
86
87
88
89
90
91
92
93
94
95
96
97
98
99
100
101
102
103
104
105
106
107
108
109
110
111
112
113
114
115
116
117
118
119
120
121
122
123
124
125
126
127
128
129
130
131
132
133
134
135
136
137
138
139
140
141
142
143
144
145
146
147
148
149
150
151
152
153
154
155
|
public class EmpManageSystem {
private static Scanner sc = new Scanner(System.in);
private static EmpDao empDao = new EmpDaoImpl();
private static DeptDao deptDao= new DeptDaoImpl();
private static SimpleDateFormat simpleDateFormat = new SimpleDateFormat("yyyy-MM-dd");
public static void main(String[] args) {
while (true){
showMenu();
System.out.println("请用户录入选项");
int i = sc.nextInt();
switch (i){
case 1:
case1();
break;
case 2:
case2();
break;
case 3:
case3();
break;
case 4:
case4();
break;
case 5:
case5();
break;
case 6:
case6();
break;
default:
System.out.println("请输入1-7的数字!!!");
break;
}
}
}
public static void showMenu(){
System.out.println("----------------------------");
System.out.println("1.查看所有员工的信息");
System.out.println("2.查看所有部门信息");
System.out.println("3.根据工号删除员工信息");
System.out.println("4.根据工号修改员工信息");
System.out.println("5.增加员工信息");
System.out.println("6.增加部门信息");
System.out.println("----------------------------");
}
public static void case1(){
List<Emp> list = empDao.findAll();
list.forEach(System.out::println);
}
public static void case2(){
List<Dept> list = deptDao.findAll();
list.forEach(System.out::println);
}
public static void case3(){
System.out.println("请输入要删除员工的工号:");
int i = sc.nextInt();
int i1 = empDao.deleteByEmpno(i);
if (i1!=0){
System.out.println("删除成功!");
}else
{
System.out.println("删除失败!");
}
}
public static void case4(){
System.out.println("*请输入员工的编号");
int empno = sc.nextInt();
System.out.println("*请输入员工的姓名");
String ename = sc.next();
System.out.println("*请输入员工的工作");
String job = sc.next();
System.out.println("*请输入员工的上级编号");
int mgr = sc.nextInt();
System.out.println("*请输入员工的聘用日期(格式为yyyy-mm-dd)");
Date hiredate = null;
try {
hiredate = simpleDateFormat.parse(sc.next());
} catch (ParseException e) {
System.out.println("请按照格式输入!!!");
e.printStackTrace();
}
System.out.println("*请输入员工的薪资");
double sal = sc.nextDouble();
System.out.println("*请输入员工的奖金");
double comm = sc.nextDouble();
System.out.println("*请输入员工的部门编号");
int deptno = sc.nextInt();
Emp emp = new Emp(empno,ename,job,mgr,hiredate,sal,comm,deptno);
empDao.updateEmp(emp);
}
public static void case5(){
System.out.println("*请输入员工的姓名");
String ename = sc.next();
System.out.println("*请输入员工的工作");
String job = sc.next();
System.out.println("*请输入员工的上级编号");
int mgr = sc.nextInt();
System.out.println("*请输入员工的聘用日期(格式为yyyy-mm-dd)");
Date hiredate = null;
try {
hiredate = simpleDateFormat.parse(sc.next());
} catch (ParseException e) {
System.out.println("请按照格式输入!!!");
e.printStackTrace();
}
System.out.println("*请输入员工的薪资");
double sal = sc.nextDouble();
System.out.println("*请输入员工的奖金");
double comm = sc.nextDouble();
System.out.println("*请输入员工的部门编号");
int deptno = sc.nextInt();
Emp emp = new Emp(null,ename,job,mgr,hiredate,sal,comm,deptno);
int i = empDao.addEmp(emp);
if (i>0){
System.out.println("添加成功");
}else{
System.out.println("添加失败!!!");
}
}
public static void case6(){
System.out.println("请输入部门号");
int deptno = sc.nextInt();
System.out.println("*请输入部门名称");
String dname = sc.next();
System.out.println("*请输入部门地址");
String loc = sc.next();
Dept dept = new Dept(deptno, dname, loc);
int i = deptDao.addDept(dept);
if (i>0){
System.out.println("添加成功");
}else{
System.out.println("添加失败!!!");
}
}
}
|
BaseDao抽取
由上面实现类的代码可以看到增删改查方法的代码都很相似,其实可以把相似的部分抽取出来称为一个BaseDao的类
增删改的抽取–baseUpdate
1
2
3
4
5
6
7
8
9
10
11
12
13
14
15
16
17
18
19
20
21
22
23
24
25
26
27
28
29
30
31
32
33
34
35
36
37
38
39
40
41
|
public static int baseUpdate(String sql,Object ... args){
Connection connection = null;
PreparedStatement preparedStatement = null;
int rows= 0;
try {
forName(driver);
connection = DriverManager.getConnection(url, user, password);
preparedStatement = connection.prepareStatement(sql);
for (int i = 0; i < args.length; i++) {
preparedStatement.setObject(i+1,args[i]);
}
rows = preparedStatement.executeUpdate();
} catch (ClassNotFoundException | SQLException e) {
e.printStackTrace();
} finally {
if (null != preparedStatement) {
try {
preparedStatement.close();
} catch (SQLException e) {
e.printStackTrace();
}
}
if (null != connection) {
try {
connection.close();
} catch (SQLException e) {
e.printStackTrace();
}
}
}
return rows;
}
|
查询的抽取–baseQuery
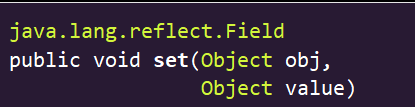
通过反射获取传入字节码的对象属性
关于反射是否破坏封装类(面试):https://www.cnblogs.com/wk-missQ1/p/13304329.html
1
2
3
4
5
6
7
8
9
10
11
12
13
14
15
16
17
18
19
20
21
22
23
24
25
26
27
28
29
30
31
32
33
34
35
36
37
38
39
40
41
42
43
44
45
46
47
48
49
50
51
52
53
54
55
56
57
58
59
60
61
62
63
64
65
66
67
68
69
70
71
72
73
74
75
76
77
78
79
80
81
82
83
84
85
86
87
88
89
90
91
92
93
94
95
|
public static List baseQuery(Class clazz,String sql,Object ... args){
Connection connection = null;
PreparedStatement preparedStatement = null;
ResultSet resultSet = null;
List list = null;
try {
forName(driver);
connection = DriverManager.getConnection(url, user, password);
preparedStatement = connection.prepareStatement(sql);
list= new ArrayList<>();
for (int i = 0; i < args.length; i++) {
preparedStatement.setObject(i+1,args[i]);
}
resultSet = preparedStatement.executeQuery();
Field[] fields = clazz.getDeclaredFields();
for (Field field : fields) {
field.setAccessible(true);
}
while (resultSet.next()) {
Object obj = clazz.newInstance();
for (Field field : fields) {
String name = field.getName();
Object data = resultSet.getObject(name);
field.set(data,obj);
}
list.add(obj);
}
} catch (ClassNotFoundException | SQLException e) {
e.printStackTrace();
} catch (IllegalAccessException e) {
e.printStackTrace();
} catch (InstantiationException e) {
e.printStackTrace();
} finally {
if (null != resultSet) {
try {
resultSet.close();
} catch (SQLException e) {
e.printStackTrace();
}
}
if (null != preparedStatement) {
try {
preparedStatement.close();
} catch (SQLException e) {
e.printStackTrace();
}
}
if (null != connection) {
try {
connection.close();
} catch (SQLException e) {
e.printStackTrace();
}
}
}
return list;
}
for (int i = 0; i < args.length; i++) {
preparedStatement.setObject(i+1,args[i]);
}
resultSet = preparedStatement.executeQuery();
Field[] fields = clazz.getDeclaredFields();
for (Field field : fields) {
field.setAccessible(true);
}
while (resultSet.next()) {
Object obj = clazz.newInstance();
for (Field field : fields) {
String name = field.getName();
Object data = resultSet.getObject(name);
field.set(data,obj);
}
list.add(obj);
}
|
这样一来,两个实现类中间的增删改操作就可以被简化
实现类简化结果
DeptDaoImpl.java
1
2
3
4
5
6
7
8
9
10
11
12
13
| public class DeptDaoImpl extends BaseDao implements DeptDao {
@Override
public List<Dept> findAll() {
String sql = "select * from dept ";
return baseQuery(Dept.class,sql);
}
@Override
public int addDept(Dept dept) {
String sql = "insert into dept values(?,?,?)";
return baseUpdate(sql,dept.getDeptno(),dept.getDname(),
dept.getLoc());
}
}
|
EmpDaoImpl.java
1
2
3
4
5
6
7
8
9
10
11
12
13
14
15
16
17
18
19
20
21
22
23
24
25
26
27
28
| public class EmpDaoImpl extends BaseDao implements EmpDao {
@Override
public int addEmp(Emp emp) {
String sql = "insert into emp values(DEFAULT,?,?,?,?,?,?,?)";
return baseUpdate(sql,emp.getEname(),emp.getJob(),emp.getMgr(),
emp.getHiredate(),emp.getSal(),emp.getComm(),emp.getDeptno());
}
@Override
public int deleteByEmpno(int empno) {
String sql = "delete from emp where empno = ?";
return baseUpdate(sql,empno);
}
@Override
public List<Emp> findAll() {
String sql = "select * from emp ";
return baseQuery(Emp.class,sql);
}
@Override
public int updateEmp(Emp emp) {
String sql = "update emp set ename = ?,job = ?,mgr = ?,hiredate=?,sal=?,comm=? ,deptno = ? where empno = ?";
return baseUpdate(sql,emp.getEname(),emp.getJob(),emp.getMgr(),
emp.getHiredate(),emp.getSal(),emp.getComm(),emp.getDeptno(),emp.getEmpno());
}
}
|
错误总结:
java.lang.IllegalArgumentException:传入参数传错了
连接池
MyConnectionPool.java
创建一个连接对象
1
2
|
private static LinkedList<Connection> pool;
|
静态代码块
1
2
3
4
5
6
7
8
9
10
11
12
13
14
15
16
17
18
19
|
static{
try {
Class.forName(driver);
} catch (ClassNotFoundException e) {
e.printStackTrace();
}
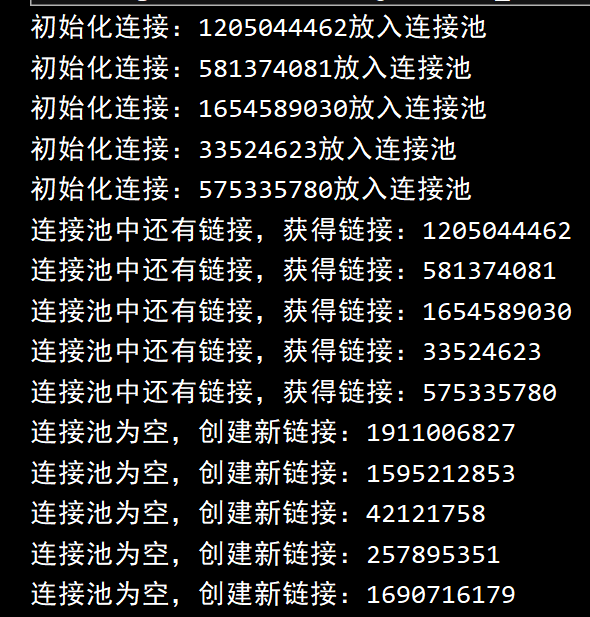
pool = new LinkedList<>();
for (int i = 0; i < initSize; i++) {
Connection connection = initConnection();
if(null != connection){
pool.add(connection);
System.out.println("初始化连接:"+connection.hashCode()+"放入连接池");
}
}
}
|
私有的初始化一个链接对象的方法
1
2
3
4
5
6
7
8
9
10
11
12
|
private static Connection initConnection(){
try {
return DriverManager.getConnection(url,user,password);
} catch (SQLException e) {
e.printStackTrace();
}
return null;
}
|
公有的向外界提供链接对象
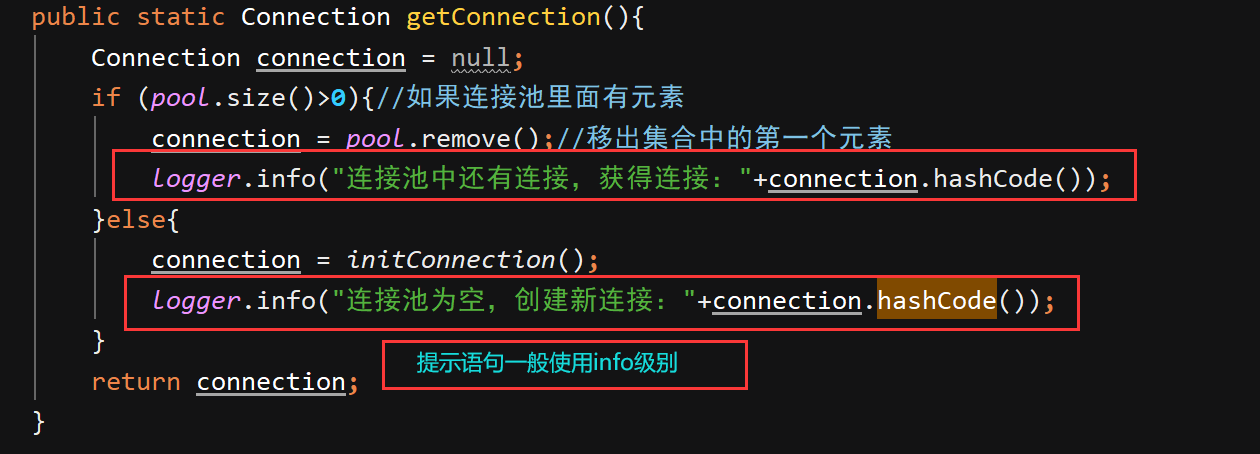
- 如果池子里有对象
- 如果池子没了:创建新的对象
- 最后返回对象
1
2
3
4
5
6
7
8
9
10
11
12
13
14
15
|
public static Connection getConnection(){
Connection connection = null;
if (pool.size()>0){
connection = pool.remove();
System.out.println("连接池中还有链接,获得链接:"+connection.hashCode());
}else{
connection = initConnection();
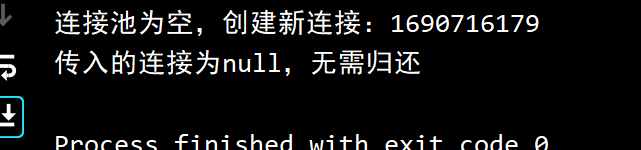
System.out.println("连接池为空,创建新链接:"+connection);
}
return connection;
}
|
公有的向链接对象归还链接对象的方法
- 若链接没有被关闭
- 调整事务状态,设置为手动提交
- 容量小于最大容量
- 容量达到最大容量
- 若已经被关闭,打印:无需关闭,不用归还
1
2
3
4
5
6
7
8
9
10
11
12
13
14
15
16
17
18
19
20
21
22
23
24
25
|
public static void returnConnection(Connection connection){
if (null != connection){
try {
if (!connection.isClosed())
if (pool.size()< maxSize){
connection.setAutoCommit(true);
pool.addLast(connection);
System.out.println("连接池未满,归还链接对象:"+connection.hashCode());
}else{
connection.close();
System.out.println("连接池已满,关闭连接池");
}
}else{
System.out.println("连接已经关闭无需归还");
}
} catch (SQLException e) {
e.printStackTrace();
}
}else{
System.out.println("传入的连接为null,无需归还");
|
测试
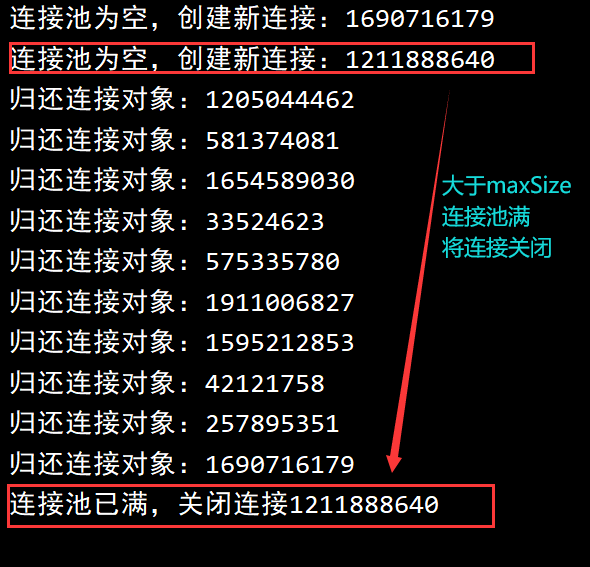
创建多个连接:
1
2
3
| Connection connection1 = MyConnectionPool.getConnection();
...
Connection connection11 = MyConnectionPool.getConnection();
|
结果:前面小于initSize的部分个从连接池里取,后面超过的部分直接初始化。
归还连接
传入null值
1
| MyConnectionPool.returnConnection(null);
|
结果:
传入已关闭的连接
1
2
| connection1.close();
MyConnectionPool.returnConnection(connection1);
|
结果:

传入超过maxSize的连接
1
| MyConnectionPool.returnConnection(connection11);
|
BaseDao改进
原来的参数可以删除

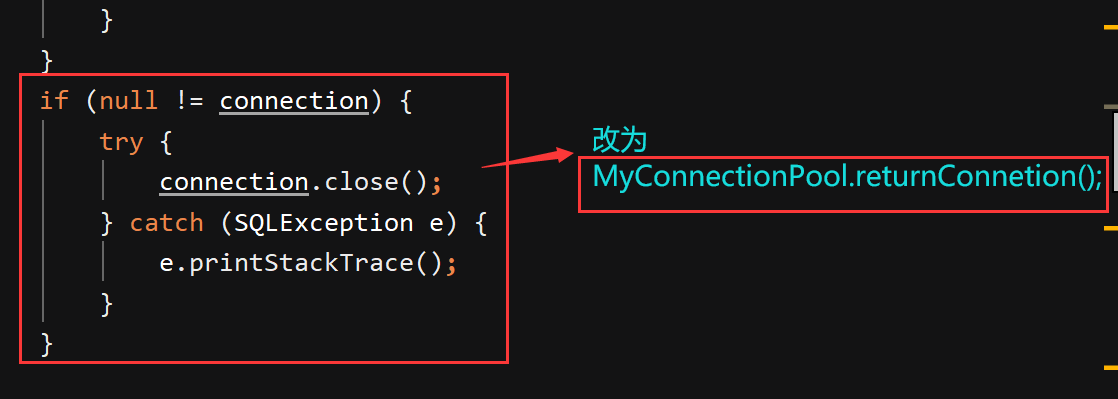
加载驱动和连接部分改进
连接最后归还
BaseDao.java
1
2
3
4
5
6
7
8
9
10
11
12
13
14
15
16
17
18
19
20
21
22
23
24
25
26
27
28
29
30
31
32
33
34
35
36
37
38
39
40
41
42
43
44
45
46
47
48
49
50
51
52
53
54
55
56
57
58
59
60
61
62
63
64
65
66
67
68
69
70
71
72
73
74
75
76
77
78
79
80
81
82
83
84
85
86
87
88
89
90
91
92
93
94
95
96
97
98
99
100
101
102
| public abstract class BaseDao {
public static int baseUpdate(String sql,Object ... args){
Connection connection = null;
PreparedStatement preparedStatement = null;
int rows= 0;
try {
connection = MyConnectionPool.getConnection();
preparedStatement = connection.prepareStatement(sql);
for (int i = 0; i < args.length; i++) {
preparedStatement.setObject(i+1,args[i]);
}
rows = preparedStatement.executeUpdate();
} catch (SQLException e) {
e.printStackTrace();
} finally {
if (null != preparedStatement) {
try {
preparedStatement.close();
} catch (SQLException e) {
e.printStackTrace();
}
}
MyConnectionPool.returnConnection(connection);
}
return rows;
}
public static List baseQuery(Class clazz,String sql,Object ... args){
Connection connection = null;
PreparedStatement preparedStatement = null;
ResultSet resultSet = null;
List list = null;
try {
connection = MyConnectionPool.getConnection();
preparedStatement = connection.prepareStatement(sql);
list= new ArrayList<>();
for (int i = 0; i < args.length; i++) {
preparedStatement.setObject(i+1,args[i]);
}
resultSet = preparedStatement.executeQuery();
Field[] fields = clazz.getDeclaredFields();
for (Field field : fields) {
field.setAccessible(true);
}
while (resultSet.next()) {
Object obj = clazz.newInstance();
for (Field field : fields) {
String name = field.getName();
Object data = resultSet.getObject(name);
field.set(obj,data);
}
list.add(obj);
}
} catch (Exception e) {
e.printStackTrace();
} finally {
if (null != resultSet) {
try {
resultSet.close();
} catch (SQLException e) {
e.printStackTrace();
}
}
if (null != preparedStatement) {
try {
preparedStatement.close();
} catch (SQLException e) {
e.printStackTrace();
}
}
MyConnectionPool.returnConnection(connection);
}
return list;
}
}
|
配置文件优化连接池
注意格式:空格不能随便加
PropertiesUtil工具类
- 创建工具类
- 定义构造方法
- 传进配置文件的路径
- 通过字节码获取文件路径
- 加载IO流
- 定义一个获得参数的方法
1
2
3
4
5
6
7
8
9
10
11
12
13
14
15
16
17
18
19
20
21
22
23
24
25
26
27
28
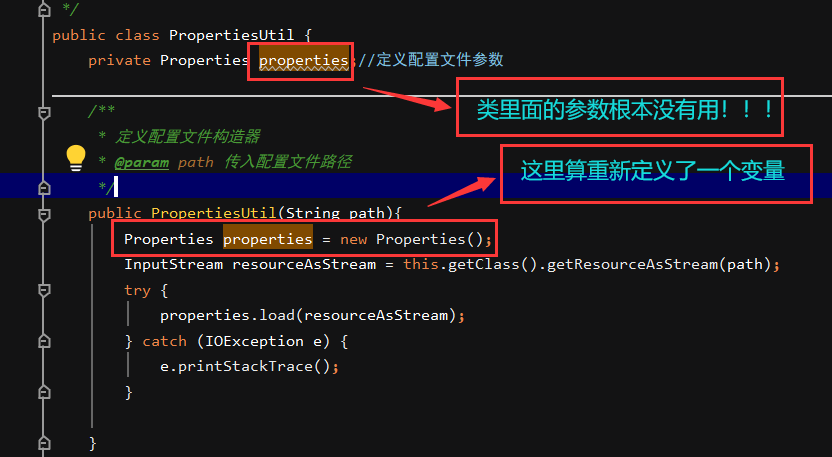
| public class PropertiesUtil {
private Properties properties;
public PropertiesUtil(String path){
properties = new Properties();
InputStream resourceAsStream = this.getClass().getResourceAsStream(path);
try {
properties.load(resourceAsStream);
} catch (IOException e) {
e.printStackTrace();
}
}
public String getProperties(String key){
return properties.getProperty(key);
}
}
|
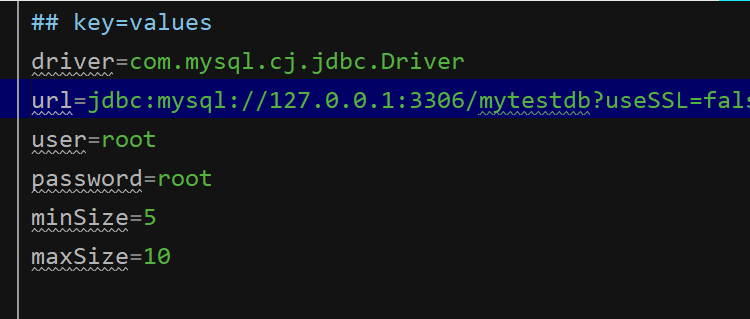
连接池优化
删除参数值

在静态代码块里配置参数
1
2
3
4
5
6
7
8
|
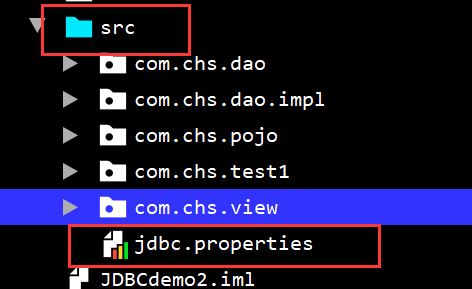
PropertiesUtil propertiesUtil = new PropertiesUtil("/jdbc.properties");
driver = propertiesUtil.getProperties("driver");
url = propertiesUtil.getProperties("url");
user = propertiesUtil.getProperties("user");
password = propertiesUtil.getProperties("password");
initSize = Integer.parseInt(propertiesUtil.getProperties("initSize"));
maxSize = Integer.parseInt(propertiesUtil.getProperties("maxSize"));
|
错误总结
连接池的定义好像出现了某种问题
Exception in thread “main” java.lang.NoClassDefFoundError: Could not initialize class com.chs.dao.MyConnectionPool
发现是构造器中没有用到本身的参数,而是重新定义了一个参数:
8. log4j日志
什么是日志log
异常信息 登录成功失败的信息 其他重要操作的信息,日志可以记录程序的运行状态,运行信息,用户的一些常用操作.日志可以帮助我们分析程序的运行状态,帮我们分析用户的操作习惯,进而对程序进行改
如何记录日志
方式1:System.out.println(…..) e.printStackTrace();
缺点:不是保存到文件,不能长久存储
方式2:IO流 将System.out.println(…..) e.printStackTrace();写入文件
缺点:操作繁琐,IO流操作容易阻塞线程,日志没有等级,日志的格式不能很好的定制,要想实行编程复杂
方式3:使用现成的日志框架,比如log4j
优点:1长久保存 2有等级3格式可以很好的定制 4代码编写简单
log4j日志的级别
FATAL: 指出现非常严重的错误事件,这些错误可能导致应用程序异常中止
ERROR: 指虽有错误,但仍允许应用程序继续运行
WARN: 指运行环境潜藏着危害
INFO: 指报告信息,这些信息在粗粒度级别上突出显示应用程序的进程
DEBUG: 指细粒度信息事件,对于应用程序的调试是最有用的
使用log4j记录日志
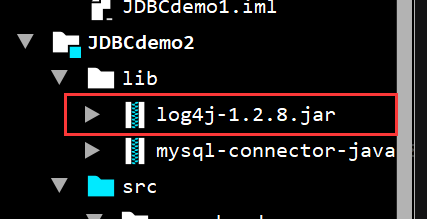
加入jar包 log4j-1.2.8.jar
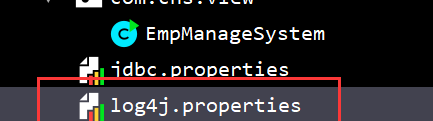
加入属性文件 src 下 log4j.properties
1
2
3
4
5
6
7
8
9
10
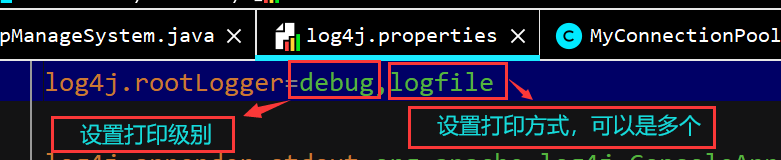
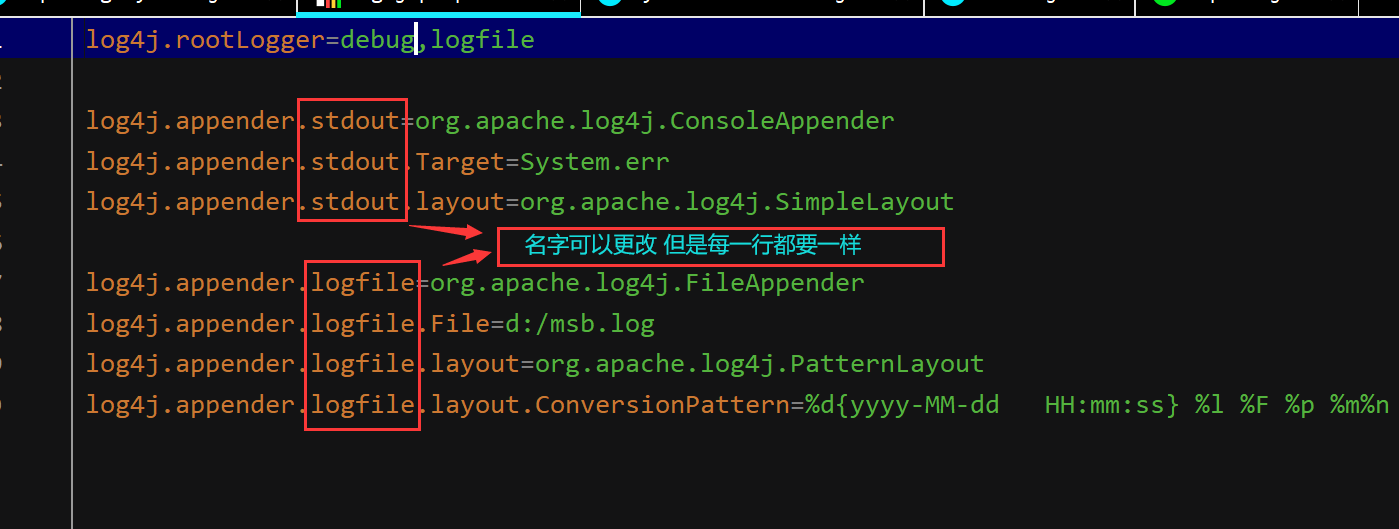
| log4j.rootLogger=error,logfile
log4j.appender.stdout=org.apache.log4j.ConsoleAppender
log4j.appender.stdout.Target=System.err
log4j.appender.stdout.layout=org.apache.log4j.SimpleLayout
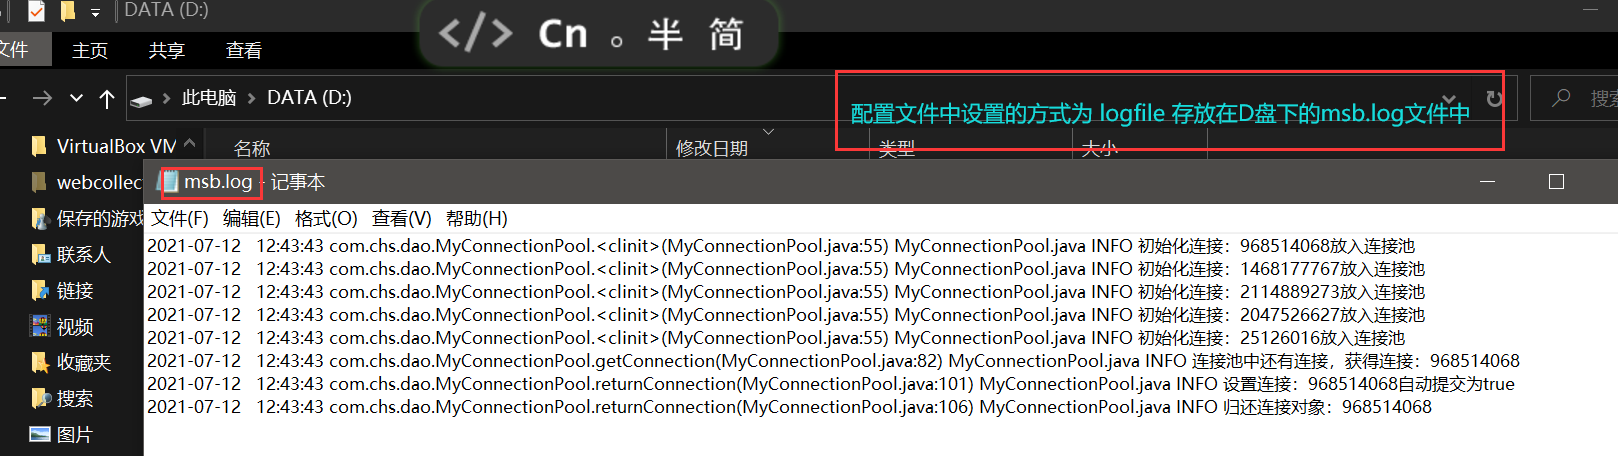
log4j.appender.logfile=org.apache.log4j.FileAppender
log4j.appender.logfile.File=d:/msb.log
log4j.appender.logfile.layout=org.apache.log4j.PatternLayout
log4j.appender.logfile.layout.ConversionPattern=%d{yyyy-MM-dd HH:mm:ss} %l %F %p %m%n
|
通过属性文件理解log4j的主要API
Appender 日志目的地 :ConsoleAppender FileAppender
Layout 日志格式化器 :SimpleLayout PatternLayout
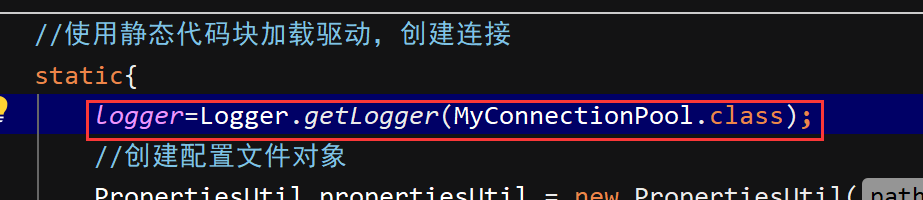
以连接池为例:
添加日志对象

初始化日志
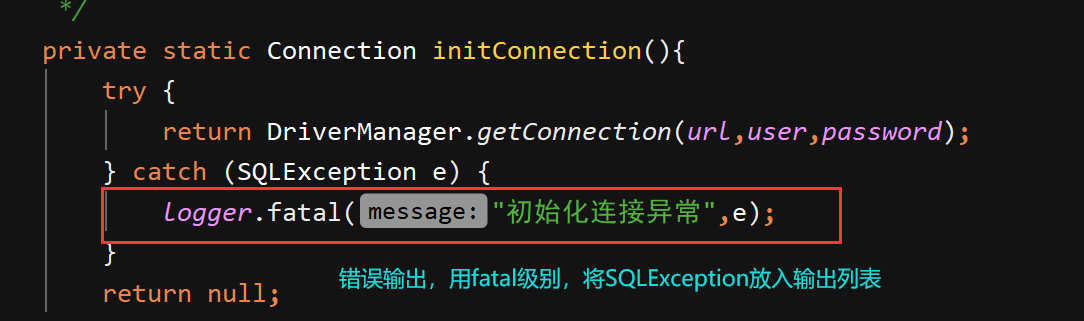
将sout语句和错误打印改为日志输出:
运行结果:
补充
1
2
3
4
5
6
7
8
9
10
11
12
13
14
| %p:输出日志信息的优先级,即DEBUG,INFO,WARN,ERROR,FATAL。
%d:输出日志时间点的日期或时间,默认格式为ISO8601,也可以在其后指定格式,如:%d{yyyy/MM/dd HH:mm:ss,SSS}。
%r:输出自应用程序启动到输出该log信息耗费的毫秒数。
%t:输出产生该日志事件的线程名。
%l:输出日志事件的发生位置,相当于%c.%M(%F:%L)的组合,包括类全名、方法、文件名以及在代码中的行数。例如
test.TestLog4j.main(TestLog4j.java:10)。
%c:输出日志信息所属的类目,通常就是所在类的全名。
%M:输出产生日志信息的方法名。
%F:输出日志消息产生时所在的文件名称。
%L::输出代码中的行号。
%m::输出代码中指定的具体日志信息。
%n:输出一个回车换行符,Windows平台为"rn",Unix平台为"n"。
%x:输出和当前线程相关联的NDC(嵌套诊断环境),尤其用到像java servlets这样的多客户多线程的应用中。
%%:输出一个"%"字符。
|
9. 三大范式
第一范式(1NF)
要求数据库表的每一列都是不可分割的原子数据项。
举例说明:
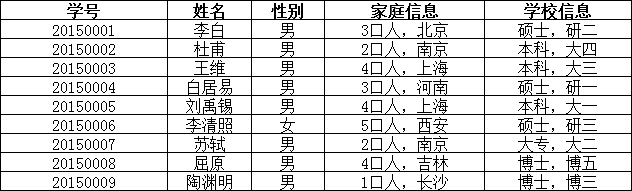
在上面的表中,“家庭信息”和“学校信息”列均不满足原子性的要求,故不满足第一范式,调整如下:
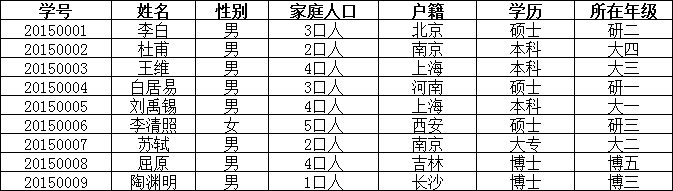
可见,调整后的每一列都是不可再分的,因此满足第一范式(1NF);
第二范式(2NF)
在1NF的基础上,非码属性必须完全依赖于候选码(在1NF基础上消除非主属性对主码的部分函数依赖)
第二范式需要确保数据库表中的每一列都和主键相关,而不能只与主键的某一部分相关(主要针对联合主键而言)。
举例说明:
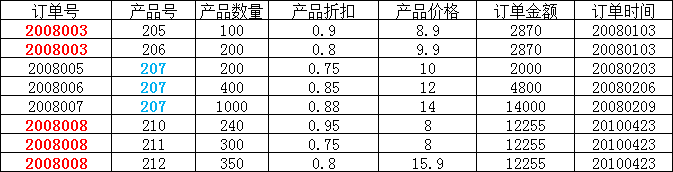
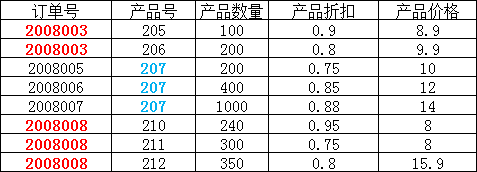
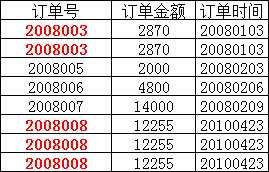
在上图所示的情况中,同一个订单中可能包含不同的产品,因此主键必须是“订单号”和“产品号”联合组成,
但可以发现,产品数量、产品折扣、产品价格与“订单号”和“产品号”都相关,但是订单金额和订单时间仅与“订单号”相关,与“产品号”无关,
这样就不满足第二范式的要求,调整如下,需分成两个表:
第三范式(3NF)
在2NF基础上,任何非主属性不依赖于其它非主属性(在2NF基础上消除传递依赖)
第三范式需要确保数据表中的每一列数据都和主键直接相关,而不能间接相关。
举例说明:
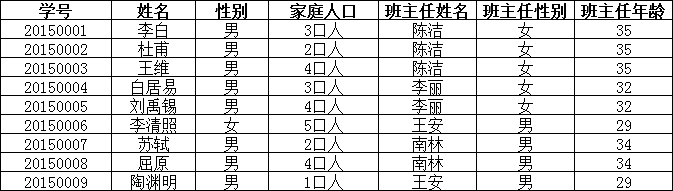
上表中,所有属性都完全依赖于学号,所以满足第二范式,但是“班主任性别”和“班主任年龄”直接依赖的是“班主任姓名”,
而不是主键“学号”,所以需做如下调整:
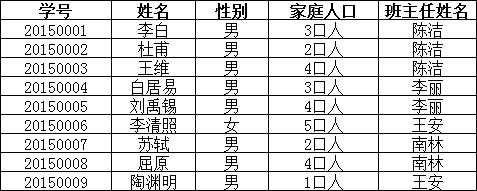
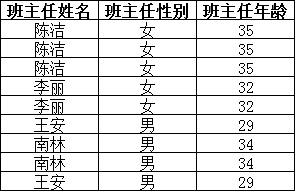
这样以来,就满足了第三范式的要求。
ps:如果把上表中的班主任姓名改成班主任教工号可能更确切,更符合实际情况,不过只要能理解就行。
总结
- 优点:结构合理、冗余较小、尽量避免插入删除修改异常