引入 为什么使用jQuery? 使用原生JavaScript编码存在问题
1选择器功能弱
2 DOM操作繁琐之极
3浏览器兼容性不好
4动画功能弱
优点 1强大的选择器
2出色的DOM封装
3出色的浏览器兼容性
4强大的动画功能
5体积小,压缩后只有100KB左右
6可靠的事件处理机制
7使用隐式迭代简化编程
8丰富的插件支持
定义 目前最流行的JavaScript函数库之一,对JavaScript进行了封装。并不是一门新语言。将常用的、复杂的操作进行函数化封装,直接调用,大大降低了使用JavaScript的难度,改变了使用JavaScript的习惯。jQuery能做的JavaScript也能做,但使用jQuery能大幅提高开发效率,由美国人John Resig在2006年推出,目前最新版本是v3.5.1。宗旨:Write less,do more(写更少代码,做更多事情)。官方网址http://jquery.com/
==$()== 作用一:页面加载函数
1 2 3 4 5 6 7 8 9 10 11 12 13 14 15 16 17 18 19 20 21 22 23 24 $(function ( var domS1=document .getElementById ("s1" ); console .log (domS1.innerText ); }) $(function ( console .log ("第二个页面加载函数" ) }) $(function ( console .log ("第三个页面加载函数" ) })
作用二:选择器标志
$(selector)
选择器 基本选择器 1 2 3 4 5 6 7 8 9 10 11 12 13 14 15 16 17 18 19 20 $("h3" ).addClass ("myClass" ); $("p" ).addClass ("myClass" ); $("#h31" ).addClass ("myClass" ); $("h3#h31" ).addClass ("myClass" ); $(".red1" ).addClass ("myClass" ); $("*" ).addClass ("myClass" ); $("#h31,span,div" ).addClass ("myClass" ); $("p span" ).addClass ("myClass" ); $("p>span" ).addClass ("myClass" ); $("h3+p" ).addClass ("myClass" ); $("h3~p" ).addClass ("myClass" );
属性选择器 1 2 3 4 5 6 7 8 9 10 11 12 13 14 15 $("a" ).addClass ("myClass" ); $("a[href]" ).addClass ("myClass" ); $("a[href][title]" ).addClass ("myClass" ); $("a[href='film-2.html']" ).addClass ("myClass" ); $("a[href][href!='film-2.html']" ).addClass ("myClass" ); $("a[href^='http']" ).addClass ("myClass" ); $("a[href$='htm']" ).addClass ("myClass" ); $("a[href*='mashibing']" ).addClass ("myClass" );
位置选择器 1 2 3 4 5 6 7 8 9 10 11 12 13 14 15 16 17 18 19 20 21 $("p:first" ).addClass ("myClass" ); $("p:last" ).addClass ("myClass" ); $("p:odd" ).addClass ("myClass" ); $("p:even" ).addClass ("myClass" ); $("p:eq(4)" ).addClass ("myClass" ); $("p:lt(4)" ).addClass ("myClass" ); $("p:gt(4)" ).addClass ("myClass" ); $("p:first-child" ).addClass ("myClass" ); $("p:last-child" ).addClass ("myClass" ); $("p:only-child" ).addClass ("myClass" ); $("p:nth-child(2)" ).addClass ("myClass" ); $("p:nth-child(odd)" ).addClass ("myClass" ); $("p:nth-child(even)" ).addClass ("myClass" ); $("p:nth-child(3n+1)" ).addClass ("myClass" );
表单选择器
关于表单项的选择器
:text :password :radio :checkbox :hidden :file :submit
:input 匹配所有 input, textarea, select 和 button 元素
关于表单项状态的选择器
:selected :checked :enabled :disabled :hidden :visible
注意$(“input”)和$(“:input”)的区别
$(“input”):标签选择器,只匹配input标签,
$(“:input”): 匹配所有 input, textarea, select 和 button 元素
1 2 3 4 5 6 7 8 9 10 11 12 13 14 15 16 17 18 19 20 var arr =$("input" ); var arr = $("input[type=hidden]" ); var arr = $("input:hidden" ); var arr = $("input,select,textarea,button" ); var arr = $(":input" ); var arr = $(":disabled" ); var arr = $(":enabled" ); var arr = $(":input:not(:disabled)" ); var arr = $(":checked" ); var arr = $(":selected" ); var arr = $("input:hidden" ) var arr = $(":input:visible" ) for (var i = 0 ; i < arr.length ; i++) { console .info (arr[i]); }
完成DOM编程 操作属性 原生js 中的通过元素.属性名或者元素.setAttribute()方式操作元素属性,jQuery给我们封装了attr() 和removeAttr(),更加便捷的操作属性
1 2 3 4 5 6 7 8 9 10 11 12 13 14 15 16 17 18 19 20 21 22 23 function fun1 ( console .log ($("#f1" ).attr ("color" )) console .log ($("#f1" ).attr ("id" )) console .log ($("#f1" ).attr ("size" )) } function fun2 ( $("#f1" ).attr ("color" ,"green" ) $("#f1" ).attr ("size" ,"5" ) } function fun3 ( $("#f1" ).removeAttr ("color" ) } function fun4 ( $("#f1" ).attr ("class" ,"a" ) }
操作样式 原生js 中的通过元素.style.样式名=’样式值’的方式操作元素样式,jQuery给我们封装了css()方法,便于我们操作样式,多数情况样式选择器使用类选择器,所以jQuery针对于这一情况,给我们封装了==addClass== ==removeClass== ==toggleClass== 三个方法
css样式
1 2 3 4 5 6 7 8 9 10 11 <style > .a { width : 100px ; height : 100px ; background-color : pink; } .b { border : 10px solid green; border-radius : 20px ; } </style >
jQuery封装的==css()==方法
1 2 3 4 5 6 7 8 9 10 11 12 13 14 15 16 17 18 19 20 21 22 23 24 25 26 27 28 29 30 <script > function fun1 ( console .log ($("#d1" ).css ("width" )); console .log ($("#d1" ).css ("height" )); console .log ($("#d1" ).css ("background-color" )); $("#d1" ).css ("width" ,"200px" ) $("#d1" ).css ("height" ,"300px" ) $("#d1" ).css ("background-color" ,"yellow" ); } function fun2 ( $("#d2" ).addClass ("b" ) } function fun3 ( $("#d2" ).removeClass ("b" ) } function fun4 ( $("#d2" ).toggleClass ("b" ) } </script >
操作文本 原生js 中的通过元素.innerText和innerHTML和.value属性操作标签内部文本和内容,jQuery给我们封装了==text(),html()和val()==三个方法
1 2 3 4 5 6 7 8 9 10 11 12 13 14 15 16 17 18 19 20 21 22 23 24 25 26 <script > function fun1 ( console .log ($("#d1" ).text ()) console .log ($("#d1" ).html ()) console .log ($("#i1" ).val ()) } function fun2 ( $("#d1" ).html ("<h1>牛气冲天</h1>" ); $("#i1" ).val ("你好" ); } function fun3 ( $("#d1" ).empty (); $("#i1" ).val ("" ); } </script >
增删元素 原生js 中的对于元素的创建,增加和删除代码比较繁琐,而jQuery从元素的创建到元素的增加和删除都给我们提供了更加便捷的方法
创建元素
追加元素
append() appendTo() 添加内部标签
before() insertBefore() 向前增加标签
after() insertAfter() 向后增加标签
删除元素
empty() 清空字标签
remove() 移除当前标签
1 2 3 4 5 6 7 8 9 10 11 12 13 14 15 16 17 18 19 20 21 22 23 24 25 26 27 28 29 30 31 32 33 34 35 36 37 38 39 40 41 42 43 44 45 46 47 48 49 50 51 52 53 <script > function fun1 ( var span1=$("<span></span>" ); span1.css ("color" ,"green" ); span1.css ("border" ,"1px solid blue" ); span1.css ("background-color" ,"lightgray" ) span1.text ("今天天气很好" ); $('#d1' ).append (span1) } function fun2 ( var h =$("<h3>测试文字</h3>" ).css ("color" ,"red" ).css ("border" ,"1px solid green" ) h.appendTo ($('#d1' )) } function fun3 ( var span1=$('<span style="color: red; border: 1px solid orangered;">测试文字</span>' ) $("#d1" ).before (span1); } function fun4 ( var span1=$('<span style="color: red; border: 1px solid orangered;">测试文字</span>' ) span1.insertBefore ($("#d1" )); } function fun5 ( var span1=$('<span style="color: red; border: 1px solid orangered;">测试文字</span>' ) $("#d1" ).after (span1); } function fun6 ( var span1=$('<span style="color: red; border: 1px solid orangered;">测试文字</span>' ) span1.insertAfter ($("#d1" )); } function fun7 ( $("#d1" ).empty () } function fun8 ( $("#d1" ).remove (); } </script >
操作事件 无非就是绑定事件,触发事件,解绑定事件.原生js中的通过DOM编程和在标签上的事件属性绑定事件,
jQuery中,我们可以使用
事件的绑定:
==bind()==
==live()==(1.8及之前可用)
==on()==(1.9之后推荐使用),==one()==
事件解绑定:==unbind()==
事件的触发:行为触发, jQuery方法触发
1 2 3 4 5 6 7 8 9 10 11 12 13 14 15 16 17 18 19 20 21 22 23 24 25 26 27 28 29 30 31 32 33 34 35 36 37 38 39 40 41 42 43 44 45 46 47 48 49 50 51 52 53 54 55 56 57 58 <script > function fun1 ( $("#d1" ).bind ('mouseover' ,function ( $('#d1' ).css ("background-color" ,'yellow' ) }); $("#d1" ).mouseleave (function ( $('#d1' ).css ("background-color" ,'lightgreen' ) }); } function fun2 ( $("#d1" ).unbind ("mouseover" ) } function fun3 ( $("#i1" ).focus () } function fun4 ( console .log ("获得焦点了" ) } </script >
jQuery对象和DOM对象的转换 使用原生JS方式获得的页面结点对象我们可以简称为DOM对象,使用jQuery核心函数获得的对象我们可以简称为jQuery对象,这两种方式获得的对象即是是页面上同一个元素,那么也是不一样的,二者之间的API是不通用的.而在某些情况下,我们往往无法选择接收的对象,只能被动使用,那么这个时候我们可以让二者实现转换,以达到可以调用API实现功能的目的
使用原生JSDOM对象转换成jQuery对象方式是==$(dom对象)==
jQuery对象转换成DOM对象的方式是==jQuery对象[0]/.get(0)==,
1 2 3 4 5 6 7 8 9 10 11 12 13 14 15 16 17 18 19 20 21 22 23 24 25 26 27 28 <script > $(function ( var div1=document .getElementById ("d1" ); var div2=$("#d1" ); console .log (div1.innerText ); console .log (div2.text ()); console .log (div1) console .log (div2) console .log ($(div1).text ()); console .log (div2.get (0 ).innerText ) console .log (div2[0 ].innerText ) }) </script >
迭代遍历方式 jQuery给我们封装了一个快捷遍历元素的方法,接下来我们就使用一下jQuery中新的遍历方式
1 2 3 4 5 6 7 8 9 10 11 12 13 14 15 16 17 18 19 20 21 22 23 24 25 26 27 28 29 30 31 32 33 34 35 36 37 <script > $(function ( var $lis =$("li" ); console .log ($lis) for (var i =0 ;i<$lis.length ;i++){ console .log ($lis.get (i)) } $lis.each (function (i,e ){ console .log (i+">" +$(e).text ()) }); $.each ($lis,function (i,e ){ console .log (i+">" +$(e).text ()) }); }) </script >
动画效果 显示和隐藏
==show()== :实现简单显示动画效果方法
==hide()== :实现简单隐藏动画效果方法
==toggle()== :实现切换简单显示和隐藏动画效果方法
1 2 3 4 5 6 7 8 9 10 11 12 13 14 15 16 17 18 19 20 21 22 23 24 25 26 27 28 29 30 31 32 33 34 35 36 <!DOCTYPE html > <html > <head > <meta charset ="utf-8" /> <title > </title > <style > #d1 { width : 200px ; height : 200px ; background-color : yellow; display : none; } </style > <script type ="text/javascript" src ="js/jquery.min.js" > </script > <script > function fun1 ( $("#d1" ).show (2000 ); } function fun2 ( $("#d1" ).hide (3000 ) } function fun3 ( $("#d1" ).toggle (5000 ); } </script > </head > <body > <div id ="d1" > </div > <input type ="button" value ="show" onclick ="fun1()" /> <input type ="button" value ="hide" onclick ="fun2()" /> <input type ="button" value ="toggle" onclick ="fun3()" /> </body > </html >
滑动动画效果
==slideDown()==:实现向下滑动效果
==slideUp()==:实现向上滑动效果
==slideToggle()==:实现滑动切换动画效果
1 2 3 4 5 6 7 8 9 10 11 12 <script > function fun1 ( $("#d1" ).slideDown (2000 ); } function fun2 ( $("#d1" ).slideUp (3000 ) } function fun3 ( $("#d1" ).slideToggle (5000 ); } </script >
淡入淡出动画效果
==fadeln()==: 实现淡入动画效果
==fadeOut()==:实现淡出动画效果
==fadeToggle()==:实现淡入淡出切换效果
==fadeTo()==:实现淡入指定透明度效果方法
1 2 3 4 5 6 7 8 9 10 11 12 13 14 15 16 17 18 19 <script > function fun1 ( $("#d1" ).fadeIn (2000 ); } function fun2 ( $("#d1" ).fadeOut (3000 ) } function fun3 ( $("#d1" ).fadeToggle (5000 ); } function fun4 ( $("#d1" ).fadeTo (5000 ,0.2 ); } </script >
实现自定义动画效果 ==$(“”).animate({动画内容},执行时间,动画结束后要执行的方法)==
1 2 3 4 5 6 7 8 9 10 11 12 13 14 15 <script > $(function ( $("#d1" ).animate ({ width :"100px" , height :"100px" , opcity :0.5 , borderRadius :"50px" },2000 ,function ( alert ("动画执行结束了" ) }) }) </script >
表单检验 表单验证案例 验证要求 用户名不能为空
用户名长度大于等于6
用户名中不能有数字
密码不少于5位
两次密码必须一致
邮箱格式正确 必须有@和. 例如123456789@qq.com
实现效果
代码 代码改进
总结 1.对于表单的提交,要给form标签绑定onSubmit事件,而不是给submit按钮绑定onClick事件,onsubmit绑定的方法时要有return关键字,绑定的方法要返回true/false
1.对于表单的提交,要给form标签绑定onSubmit事件,而不是给submit按钮绑定onClick事件,onsubmit绑定的方法时要有return关键字,绑定的方法要返回true/false
2.表单项内容不管输入的是字符串、数字、日期,js、jQuery、JSP接收后都是String类型
3.表单的验证和String对象有密切关系 length charAt(i) indexOf(“@”)
4.如果表单项内容为空,js收到的不是null,而是空字符串。判断条件不能写 username == null,而要写username==””或username.length ==0
5.验证出错要return false,验证无错要return true,并且 onsubmit=”return checkForm()
6.该示例的缺点主要在于对于邮箱如果采用传统方式进行验证,代码繁琐并且不能保证严谨性,过度依赖String的API。对于邮箱、手机号码、邮政编码等验证,可以使用正则表达式进行验证,严谨而且简单。
正则表达式 1. 什么是正则表达式 Regular Expression,在代码中常简写为regex,正则表达式使用单个字符串来描述、匹配一系列符合某个句法规则的字符串。在很多文本编辑器里,正则表达式通常被用来检索、替换那些符合某个模式的文本。正则表达式是对字符串(包括普通字符(例如,a 到 z 之间的字母)和特殊字符(称为“元字符”))操作的一种逻辑公式,就是用事先定义好的一些特定字符、及这些特定字符的组合,组成一个“规则字符串”,这个“规则字符串”用来表达对字符串的一种过滤逻辑。正则表达式是一种文本模式,该模式描述在搜索文本时要匹配的一个或多个字符串。
2. 为什么使用正则表达式
正则表达式可以是文本的校验的代码更加简洁
正则表达式可以实现更加严谨细致的校验
3. 正则表达式举例 匹配国内电话号码:\d{3}-\d{8}|\d{4}-\d{7}
匹配腾讯QQ号:[1-9][0-9]{4,}
匹配中国邮政编码:\d{6}
匹配身份证:\d{15}|\d{18}
匹配由数字和26个英文字母组成的字符串 ^[A-Za-z0-9]+$
匹配Email地址:\w+([-+.]\w+)*@\w+([-.]\w+).\w+([-.]\w+)
匹配中文字符的正则表达式: [\u4e00-\u9fa5] [a-zA-Z]
4. JS创建正则表达式 正则表达式在JS中创建的语法为:
==var reg=/china/;==
==var reg=new RegExp(“china”);==
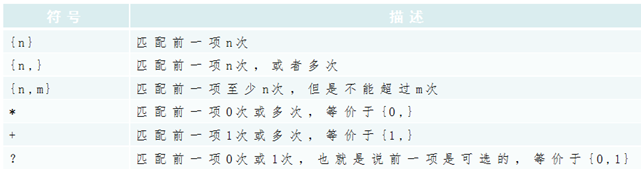
5. 通配符号 6. 重复符号 使用正则表达式实现数据验证 1 2 3 4 5 6 7 8 9 10 11 12 13 14 15 16 <script > var reg =/^\w?$/ var words ="a" ; console .log (reg.test (words)) var regex1 = /^\d{6}$/ ; var regex2 = /^1[3456789]\d{9}$/ ; var regex3 = /^\w{6,}@[0-9A-Za-z]{2,}(\.[a-zA-Z]{2,3}){1,2}$/ ; </script >
1 2 3 4 5 6 7 8 9 10 11 12 13 14 15 16 17 18 19 20 21 22 23 24 25 26 27 28 29 30 31 32 33 34 35 36 37 38 39 40 41 42 43 44 45 46 47 48 49 50 51 52 53 54 55 56 57 58 59 60 61 62 63 64 65 66 67 68 69 70 71 72 73 74 75 76 77 78 79 80 81 82 83 84 85 86 87 88 89 90 91 92 93 94 95 96 97 98 99 100 101 102 <!DOCTYPE html > <html > <head > <meta charset ="UTF-8" > <title > </title > <script type ="text/javascript" src ="js/jquery.min.js" > </script > <script > function checkUsername ( var reg1=/^\D{6,}$/ var username =$("#user" ).val (); if (!reg1.test (username)){ $("#usertip" ).html ("<font color='red'>格式必须是至少六位的非数字</font>" ); return false ; } $("#usertip" ).html ("<font color='green'>OK</font>" ) return true ; } function checkPassword ( var reg2=/^\S{5,}$/ var pwd =$("#pwd" ).val (); if (!reg2.test (pwd)){ $("#pwdtip" ).html ("<font color='red'>至少为5位非空格</font>" ); return false ; } $("#pwdtip" ).html ("<font color='green'>OK</font>" ); return true ; } function checkRepwd ( var p1=$("#pwd" ).val (); var p2=$("#repwd" ).val (); if (p1.length < 5 || p1 != p2){ $("#repwdtip" ).html ("<font color='red'>两次密码不一致</font>" ); return false ; } $("#repwdtip" ).html ("<font color='green'>OK</font>" ); return true ; } function checkEmail ( var em=$("#email" ).val (); var regex3 = /^\w{6,}@[0-9A-Za-z]{2,}(\.[a-zA-Z]{2,3}){1,2}$/ ; if (!regex3.test (em) ){ $("#emailtip" ).html ("<font color='red'>邮箱格式有误</font>" ); return false ; } $("#emailtip" ).html ("<font color='green'>OK</font>" ); return true ; } function checkForm ( return checkUsername ()&&checkPassword ()&&checkRepwd ()&&checkEmail (); } </script > </head > <body > <table id ="center" border ="0" cellspacing ="0" cellpadding ="0" > <form action ="http://www.baidu.com" method ="get" onsubmit ="return checkForm()" > <tr > <td > 您的姓名:</td > <td > <input id ="user" type ="text" name ="username" onblur ="checkUsername()" /> <div id ="usertip" style ="display: inline;" > </div > </td > </tr > <tr > <td > 输入密码:</td > <td > <input id ="pwd" name ="pwd" type ="password" onblur ="checkPassword()" /> <div id ="pwdtip" style ="display: inline;" > </div > </td > </tr > <tr > <td > 再输入一遍密码:</td > <td > <input id ="repwd" type ="password" onblur ="checkRepwd()" /> <div id ="repwdtip" style ="display: inline;" > </div > </td > </tr > <tr > <td > 您的Email:</td > <td > <input id ="email" type ="text" onblur ="checkEmail()" /> <span id ="emailtip" > </span > </td > </tr > <tr > <td colspan ="2" > <input type ="submit" value ="注册" class ="rb1" /> </td > </tr > </form > </table > </body > </html >
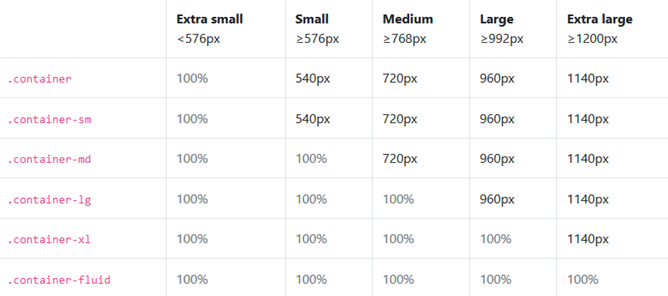
BootStrap 容器类 ==.container== 类用于固定宽度并支持响应式布局的容器。
==.container-fluid== 类用于 100% 宽度,占据全部视口(viewport)的容器。
二者区别:
固定容器的响应式布局规则是当窗口大小变化时,在指定的宽度范围内使用固定的宽度,
流容器的响应式布局规则是随着窗口大小的变化一同变化,横向全部占满
固定容器的阈值如下图:
栅格系统 Bootstrap 提供了一套响应式、移动设备优先的流式网格系统,随着屏幕或视口(viewport)尺寸的增加,系统会自动分为最多 12 列。我们也可以根据自己的需要定义列数.
网格类 Bootstrap 4 网格系统有以下 5 个类:
==.col-== 针对所有设备
==.col-sm-== 平板 - 屏幕宽度等于或大于 576px
==.col-md-== 桌面显示器 - 屏幕宽度等于或大于 768px)
==.col-lg-== 大桌面显示器 - 屏幕宽度等于或大于 992px)
==.col-xl-== 超大桌面显示器 - 屏幕宽度等于或大于 1200px)
网格系统规则 1 网格每一行需要放在设置了 .container (固定宽度) 或 .container-fluid (全屏宽度) 类的容器中,这样就可以自动设置一些外边距与内边距。
2 使用行来创建水平的列组class=row。
3 内容需要放置在列中,并且只有列可以是行的直接子节点。
4 预定义的类如 .row 和 .col-sm-4 可用于快速制作网格布局。
5 列通过填充创建列内容之间的间隙。 这个间隙是通过 .rows 类上的负边距设置第一行和最后一列的偏移。
6 网格列是通过跨越指定的 12 个列来创建。 例如,设置三个相等的列,需要使用三个.col-sm-4 来设置。
7 Bootstrap 3 和 Bootstrap 4 最大的区别在于 Bootstrap 4 现在使用 flexbox(弹性盒子) 而不是浮动。 Flexbox 的一大优势是,没有指定宽度的网格列将自动设置为等宽与等高列 。 如果您想了解有关Flexbox的更多信息,可以阅读我们的CSS Flexbox教程。
1 2 3 4 5 6 7 8 9 10 11 12 13 14 15 16 17 18 19 20 21 22 23 24 25 26 27 28 29 30 31 32 33 34 35 36 37 38 39 40 41 42 43 44 45 <!DOCTYPE html > <html > <head > <meta charset ="UTF-8" > <title > </title > <meta name ="viewport" content ="width=device-width, initial-scale=1, shrink-to-fit=no" > <link rel ="stylesheet" href ="css/bootstrap.min.css" > <script src ="js/jquery-3.5.1.min.js" > </script > <script src ="js/bootstrap.bundle.min.js" > </script > <script src ="js/bootstrap.min.js" > </script > </head > <body > <div class ="container" > <div class ="row" > <div class ="col-sm-2" style ="background-color: lavender;border:1px solid #117A8B;" > One of three columns </div > <div class ="col-sm-8" style ="background-color: lavender;border:1px solid #117A8B;" > One of three columns </div > <div class ="col-sm-2" style ="background-color: lavender;border:1px solid #117A8B;" > One of three columns </div > </div > <div class ="row" > <div class ="col-sm-1" style ="background-color: lavender;border:1px solid #117A8B;" > One of three columns </div > <div class ="col-sm-4" style ="background-color: lavender;border:1px solid #117A8B;" > One of three columns </div > <div class ="col-sm-7" style ="background-color: lavender;border:1px solid #117A8B;" > One of three columns </div > </div > </div > </body > </html >
导航栏案例 1 2 3 4 5 6 7 8 9 10 11 12 13 14 15 16 17 18 19 20 21 22 23 24 25 26 27 28 29 30 31 32 33 34 35 36 37 38 39 40 41 42 43 44 45 46 47 48 49 50 51 52 53 54 55 56 57 58 59 <!DOCTYPE html > <html > <head > <meta charset ="UTF-8" > <title > </title > <meta name ="viewport" content ="width=device-width, initial-scale=1, shrink-to-fit=no" > <link rel ="stylesheet" href ="css/bootstrap.min.css" > <script src ="js/jquery-3.5.1.min.js" > </script > <script src ="js/bootstrap.bundle.min.js" > </script > <script src ="js/bootstrap.min.js" > </script > </head > <body > <div class ="container" > <h2 > 欢迎进入马士兵教育</h2 > <br > <ul class ="nav nav-pills" role ="tablist" > <li class ="nav-item" > <a class ="nav-link active" data-toggle ="pill" href ="#home" > 主页</a > </li > <li class ="nav-item" > <a class ="nav-link" data-toggle ="pill" href ="#menu1" > 讲师介绍</a > </li > <li class ="nav-item" > <a class ="nav-link" data-toggle ="pill" href ="#menu2" > 课程介绍</a > </li > <li class ="nav-item" > <a class ="nav-link" data-toggle ="pill" href ="#menu3" > 优秀学员</a > </li > </ul > <div class ="tab-content" > <div id ="home" class ="container tab-pane active" style ="border: 10px solid red;" > <br > <h3 > 我们公司</h3 > <p > Lorem ipsum dolor sit amet, consectetur adipisicing elit, sed do eiusmod tempor incididunt ut labore et dolore magna aliqua.</p > </div > <div id ="menu1" class ="container tab-pane fade" style ="border: 10px solid green;" > <br > <h3 > 我们的优秀讲师</h3 > <p > Ut enim ad minim veniam, quis nostrud exercitation ullamco laboris nisi ut aliquip ex ea commodo consequat.</p > </div > <div id ="menu2" class ="container tab-pane fade" style ="border: 10px solid yellow;" > <br > <h3 > 我们的课程</h3 > <p > Sed ut perspiciatis unde omnis iste natus error sit voluptatem accusantium doloremque laudantium, totam rem aperiam.</p > </div > <div id ="menu3" class ="container tab-pane fade" style ="border: 10px solid blueviolet;" > <br > <h3 > 优秀学员</h3 > <p > Sed ut perspiciatis unde omnis iste natus error sit voluptatem accusantium doloremque laudantium, totam rem aperiam.</p > </div > </div > </div > </body > </html >
轮播图案例 1 2 3 4 5 6 7 8 9 10 11 12 13 14 15 16 17 18 19 20 21 22 23 24 25 26 27 28 29 30 31 32 33 34 35 36 37 38 39 40 41 42 43 44 45 46 47 48 49 50 51 52 53 54 55 56 57 58 59 60 61 62 63 64 65 66 67 68 69 70 <!DOCTYPE html > <html > <head > <meta charset ="UTF-8" > <title > </title > <meta name ="viewport" content ="width=device-width, initial-scale=1, shrink-to-fit=no" > <link rel ="stylesheet" href ="css/bootstrap.min.css" > <script src ="js/jquery-3.5.1.min.js" > </script > <script src ="js/bootstrap.bundle.min.js" > </script > <script src ="js/bootstrap.min.js" > </script > </head > <body > <div id ="carouselExampleCaptions" class ="carousel slide" data-ride ="carousel" > <ol class ="carousel-indicators" > <li data-target ="#carouselExampleCaptions" data-slide-to ="0" class ="active" > </li > <li data-target ="#carouselExampleCaptions" data-slide-to ="1" > </li > <li data-target ="#carouselExampleCaptions" data-slide-to ="2" > </li > <li data-target ="#carouselExampleCaptions" data-slide-to ="3" > </li > </ol > <div class ="carousel-inner" > <div class ="carousel-item active" > <img src ="https://static.runoob.com/images/mix/img_fjords_wide.jpg" class ="d-block w-100" alt ="..." > <div class ="carousel-caption d-none d-md-block" > <h5 > 江河</h5 > <p > Nulla vitae elit libero, a pharetra augue mollis interdum.</p > </div > </div > <div class ="carousel-item" > <img src ="https://static.runoob.com/images/mix/img_nature_wide.jpg" class ="d-block w-100" alt ="..." > <div class ="carousel-caption d-none d-md-block" > <h5 > 山川</h5 > <p > Lorem ipsum dolor sit amet, consectetur adipiscing elit.</p > </div > </div > <div class ="carousel-item" > <img src ="https://static.runoob.com/images/mix/img_mountains_wide.jpg" class ="d-block w-100" alt ="..." > <div class ="carousel-caption d-none d-md-block" > <h5 > 公路</h5 > <p > Praesent commodo cursus magna, vel scelerisque nisl consectetur.</p > </div > </div > <div class ="carousel-item" > <img src ="https://www.12306.cn/index/images/pic/banner0619.jpg" class ="d-block w-100" alt ="..." > <div class ="carousel-caption d-none d-md-block" > <h5 > 火车</h5 > <p > Praesent commodo cursus magna, vel scelerisque nisl consectetur.</p > </div > </div > </div > <a class ="carousel-control-prev" href ="#carouselExampleCaptions" role ="button" data-slide ="prev" > <span class ="carousel-control-prev-icon" aria-hidden ="true" > </span > <span class ="sr-only" > Previous</span > </a > <a class ="carousel-control-next" href ="#carouselExampleCaptions" role ="button" data-slide ="next" > <span class ="carousel-control-next-icon" aria-hidden ="true" > </span > <span class ="sr-only" > Next</span > </a > </div > </body > </html >